How to Hide Photos on iPhone on Any iOS Version [2023]
- Apple offers ways to hide photos directly within the iOS Photos app, ensuring they're out of sight from casual gallery browsing. Photos can be unhidden when needed.
- Beyond the native Photos app, users can also hide images using Google Photos' "Locked Folder" or by securing them within the Notes app.
- While these methods help keep photos private, always ensure a strong passcode is set on the device for enhanced security.
We all have some photos that we don’t want anyone to see, or revisit ourselves. There might be moments when you need to share your phone temporarily, and the last thing you want is for others to start scrolling through your photo library, stumbling upon pictures you’d rather keep to yourself.
Fortunately, Apple gives you a more convenient solution to this problem than deleting these photos—you can hide them. This article will go over the methods to hide your photos on an iPhone or an iPad. We’ll also discuss other ways to secure your personal photos and how to unhide a picture once it’s hidden.
Table of Contents:

Hiding and Un-hiding Photos on an iPhone
Within iOS, there are multiple routes to hide your photos. The most straightforward and obvious one is using the native Photos app. We’ll also discuss how to achieve the same result using Google Photos and the Notes app.
1. Using the Native Photos App
The procedure for hiding photos on an iPhone is relatively simple, but it’s a bit different from older versions of iOS. The default Photos app on iOS has a dedicated Hidden Album where all your hidden photos will be stored.
Depending on the version of iOS you’re using, the steps may appear different to you, but it’s essentially the same process.
⤷ iOS 16 or Newer
For devices running iOS 16 (iPhone 7 and newer), the steps for hiding pictures or videos via the Photos app is as follows:
- Open the Photos app on your iPhone or iPad.
- In the “Library” section, select the photo that you wish to hide.
- Tap the circled three dot menu in the top right-hand side.
- Select “Hide“
- Tap on “Hide Photo” in the confirmation dialog box that pops up.
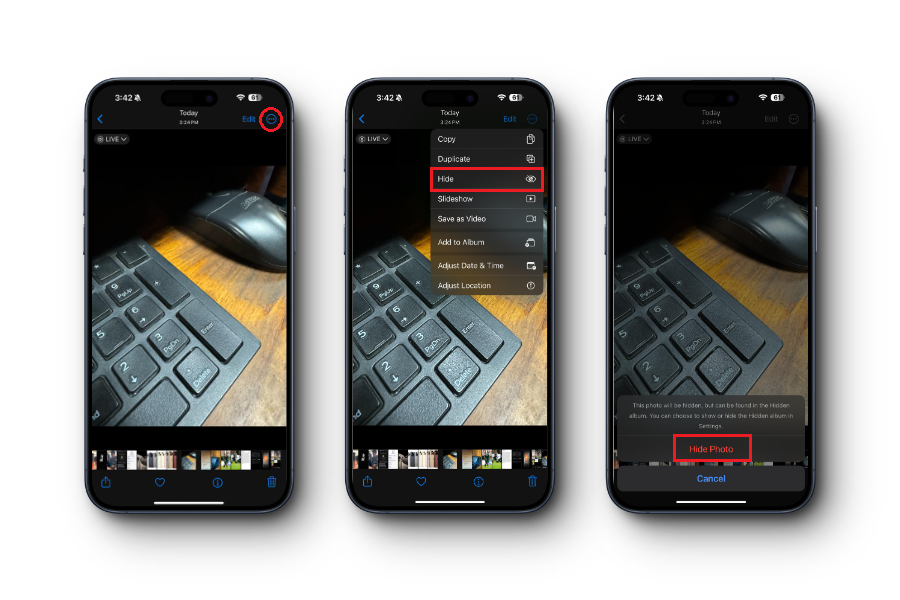
Now, your selected photos have been transferred to the “Hidden” album. By default, this album is visible to anyone using the phone. Although it removes the picture from the Photo Library and search results, anyone with access to your Passcode can easily navigate to Photos > Albums > Utilities > Hidden Album to view these photos.
To hide the “Hidden” album too, follow the steps down below:
- Open the Settings on your iPhone or iPad.
- Scroll down to “Photos“
- Find “Hidden Album,” and turn off the toggle.
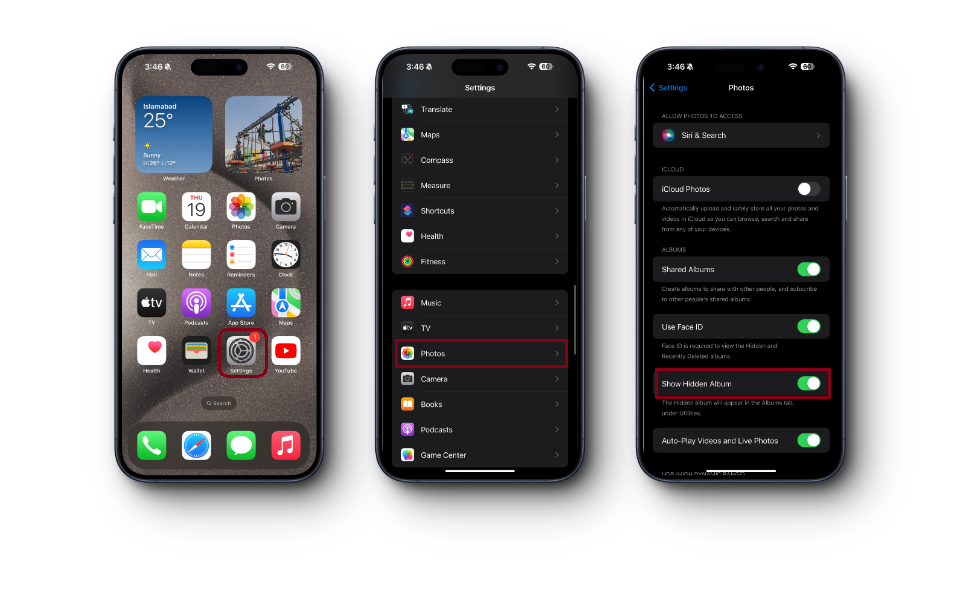
Turning off the toggle will make the Hidden album invisible to anyone visiting the Photos app. To unhide this album, simply turn the toggle back on using the steps listed above.
⤷ iOS 15 or Older
For devices running iOS 15 or older, here’s how to hide photos on iOS using the Photos app.
- Open the Photos app on your iPhone or iPad.
- Select the photos that you want to hide.
- Tap on the Share icon (a square box with a vertical arrow coming out of it).
- Scroll up and tap on “Hide.”
- Tap on “Hide Photo” in the confirmation dialog box that pops up.
Unhide Photos from the “Hidden Album”
Once you’ve hidden your photos, they are safe in the Hidden Album. However, if, for some reason, you want to unhide selected photos from this album, here’s how you can do that:
- Unhide the Hidden Album so that it appears in the Photos app.
- In the Photos app, head over to Albums > Utilities > Hidden Album.
- Select the photos that you want to unhide.
- Tap the circled three dot menu on the top right hand side.
- Select “Unhide“
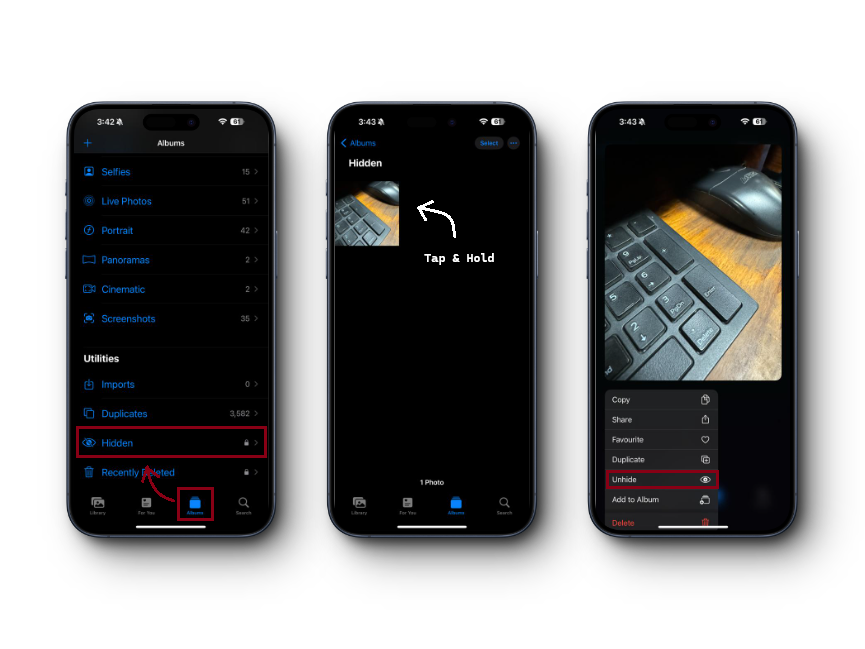
Now, these photos will again appear in your Photo Library.
2. Using Google Photos
If, for some reason, hiding your pictures via the Photos app seems too obvious, you can also do the same with Google Photos; however, the method for hiding photos here is slightly different. Google Photos has a Locked Folder feature that hides your photos by moving them from the main gallery to that album, virtually removing it entirely from your storage.
This way, there will be no way to identify whether the photo ever existed in the Library in the first place. To move your photos to the Locked Folder, follow the steps down below:
- Open Google Photos and tap on “Library” in the bottom right-hand side.
- Select “Utilities.”
- Scroll down until you find “Locked Folder.” Tap on it.
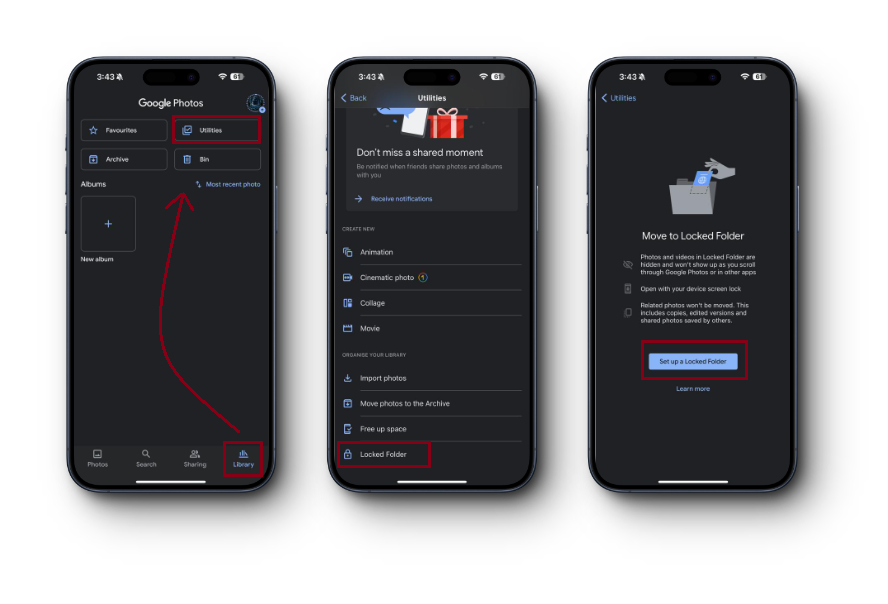
Setting up the Locked Folder on Google Photos - Google Photos will ask you to set up this album. Tap on “Set up a Locked Folder.”
- Now, you’ll see the empty album. Tap “Move items” to select photos to hide.
- Select the photo(s) you want to hide.
- Tap on “Move” in the top right-hand side.
- A prompt asking for your permission will show up. Tap “Move.”
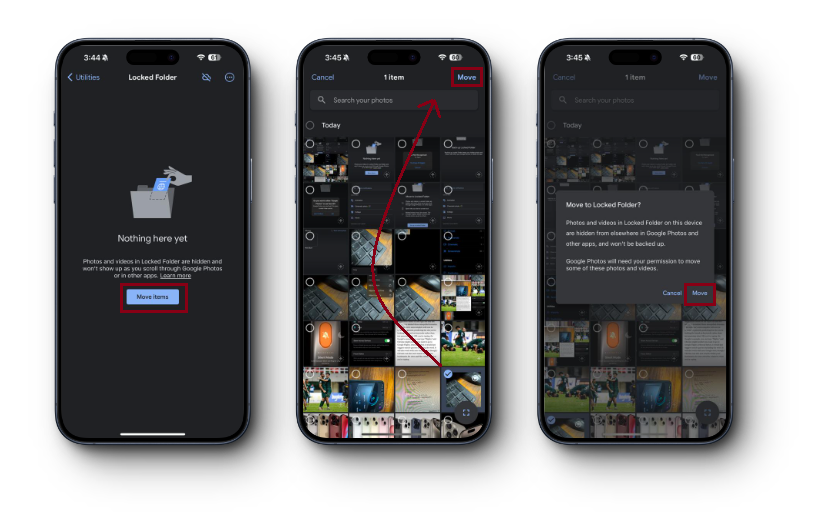
Moving photos to the Locked Folder - Voila, your photo is moved to the Locked Folder.
Unhide Photos from the Locked Folder in Google Photos
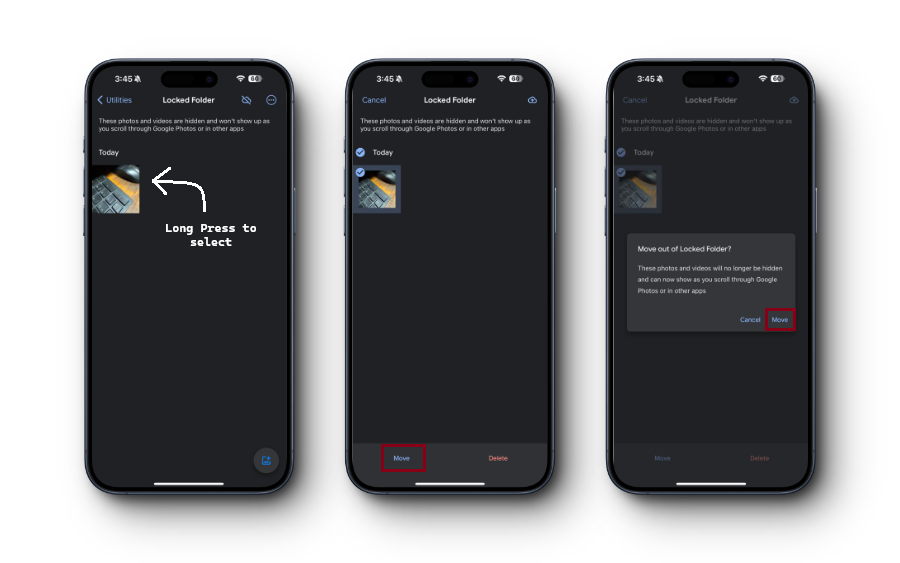
If you move your hidden photos out of the “Locked Folder,” it’ll re-appear within your photo gallery. To do this, follow the steps down below:
- Head over to Google Photos > Library > Utilities > Locked Folder.
- Select the photo you want to unhide.
- Tap on “Move” in the bottom left-hand side.
- Once prompted, tap on “Move.”
Read More: How to Import Your iCloud Photos to Google Photos
3. Using the Notes App
If you want to forever hide photos from your gallery apps in a more secure and hidden location, try and locking them in a note.
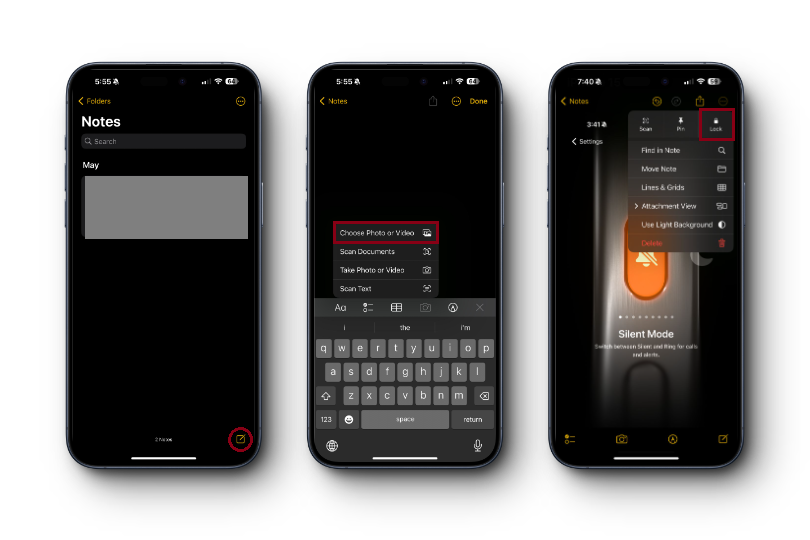
- Open the Notes app and create a new note or open an existing note.
- Tap the + icon and select Take Photo or Choose Photo to add photos to the note.
- Add any additional text or information to the note if desired.
- Tap the share icon at the top-right corner of the note and choose Lock Note.
- If you haven’t set up a password or keywords for notes before, you’ll be prompted to do so now.
Conclusion
Now that you know how to hide photos on iPhone, it’s important to remember that no hiding method is foolproof. If someone has access to your iPhone and knows your passcode, they will be able to see your hidden photos. That’s why it’s important to keep your passcode strong and secure, and to never share it with anyone, unless it’s absolutely necessary.
FAQs
To view Hidden photos, simply head to Photos > Albums > Utilities > Hidden and authenticate using FaceID or Passcode to view the album. On Google Photos, to view the Locked Folder, go to Google Photos > Library > Utilities > Locked Folder, authenticate using FaceID and view the photos that are invisible in the main gallery.
Well, Apple’s Photos and Notes app won’t be available on Android, however you can use the same method used for Google Photos’ Locked Folder to hide photos on Android.
No, they’ll be invisible from within the main gallery, and will only be accessible within the respective albums.
Well, if the picture is important to you, you should definitely go for the Google Photos’ Locked Folder method. This way, your photo will immediately be backed up and will also be accessible from an Android phone if your iPhone gets lost.
 Reviewed by