How To Animate a Picture Easily in 2023 – All Skills Levels Guide
If you’ve been active on social media, you’ve probably seen animated photos already, as they have become a standard in the realm of infographics. A video or a GIF can demystify jargon, making the information easily understandable. Alternatively, if infographics don’t appeal to you, you can animate clouds in a photo to create an aesthetical animated image.
If you are looking to animate your photos, then you are in the right place. In this guide, we will dive into three options that you can use to animate a photo.
Ways to Animate A Picture
There are multiple websites and software that you can use to animate your pictures, such as Adobe Photoshop, Canva, and PicsArt. Click on either option below to jump to its section, we’ll be starting off with the easiest one.
Animate a picture using Canva
Canva is one of the leading websites for editing images, including photo animation. Its simplicity and user-friendliness make animating images straightforward, even for beginners.
Though the animations in Canva are relatively basic with limited customization as compared to options coming next, it’s a convenient tool if you’re short on time and only require simple animations. Within a few clicks, you can animate your image using Canva. Here are the steps necessary to animate a photo in Canva.
- Start by navigating to Canva.com, and log in if you need to.
- Click on “Create A Design” in the top right menu and select a template. We suggest clicking on “Custom size” then enter your desired resolution for the animated picture. For instance, we’ll be using 1920×1080.
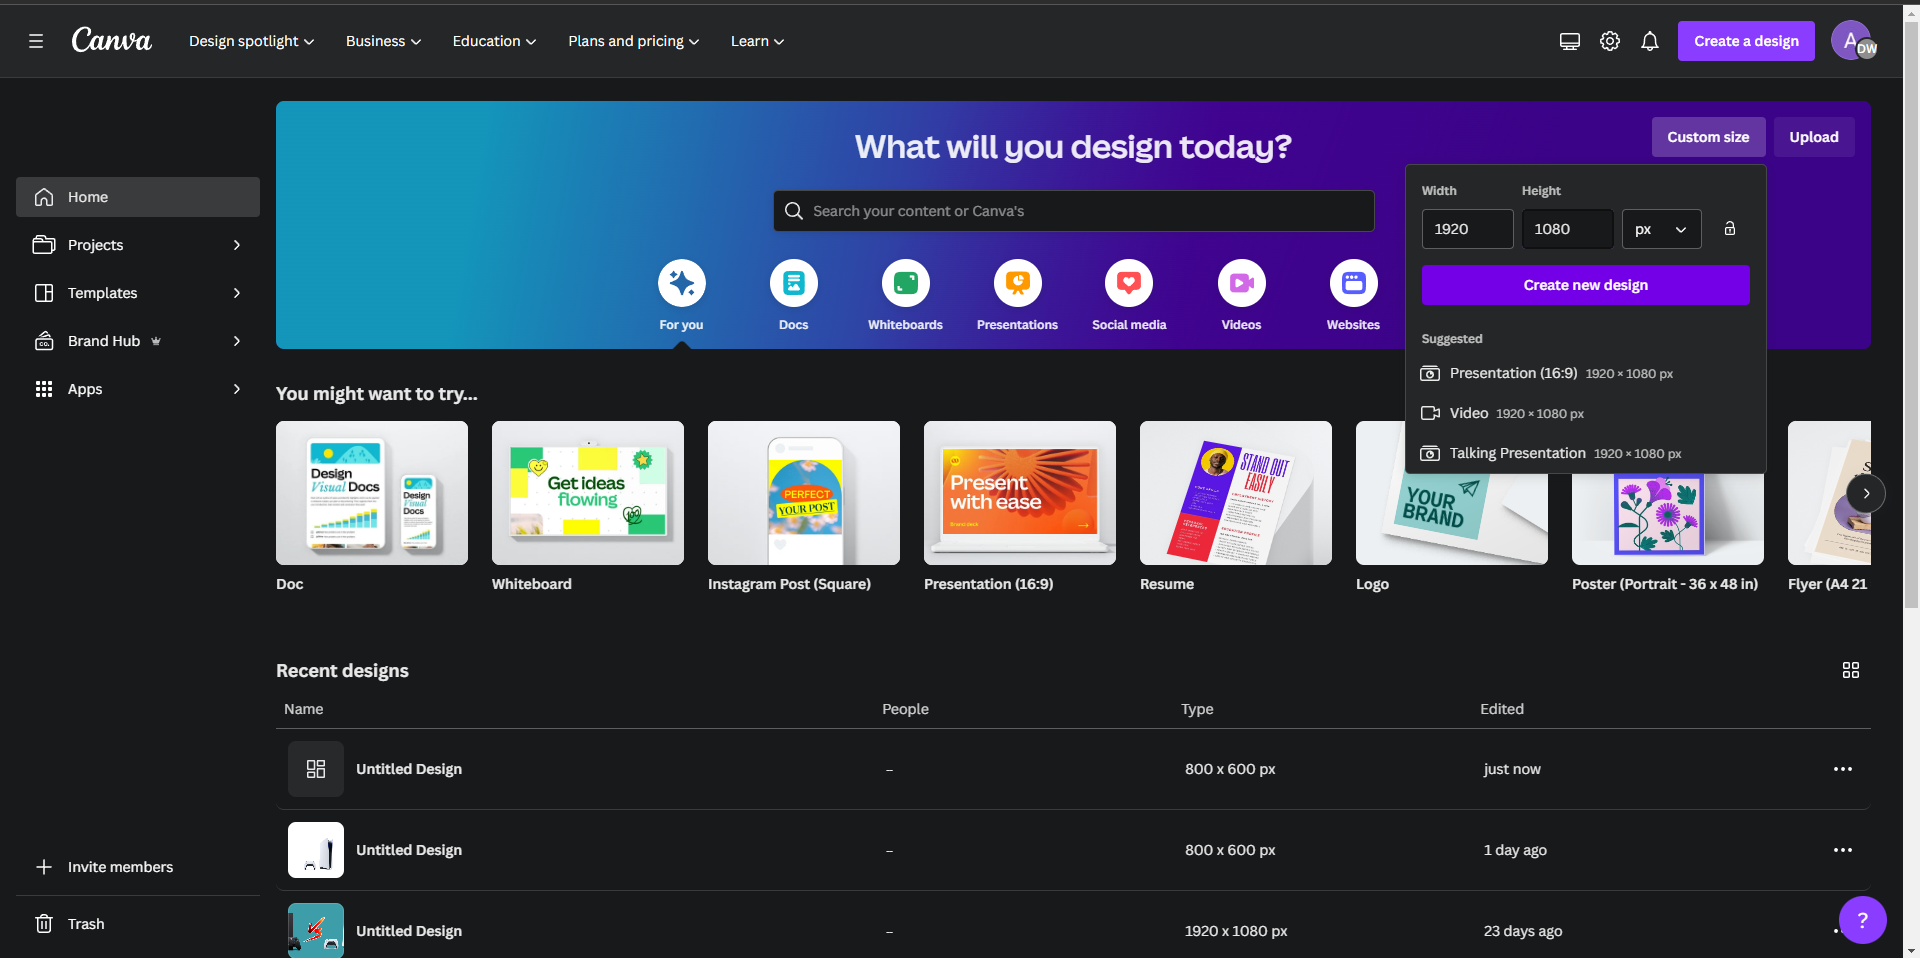
Create A Design In Canva - Next, upload the image you want to animate. You can do this by dragging the image onto the website or clicking “File” then “Import File.”
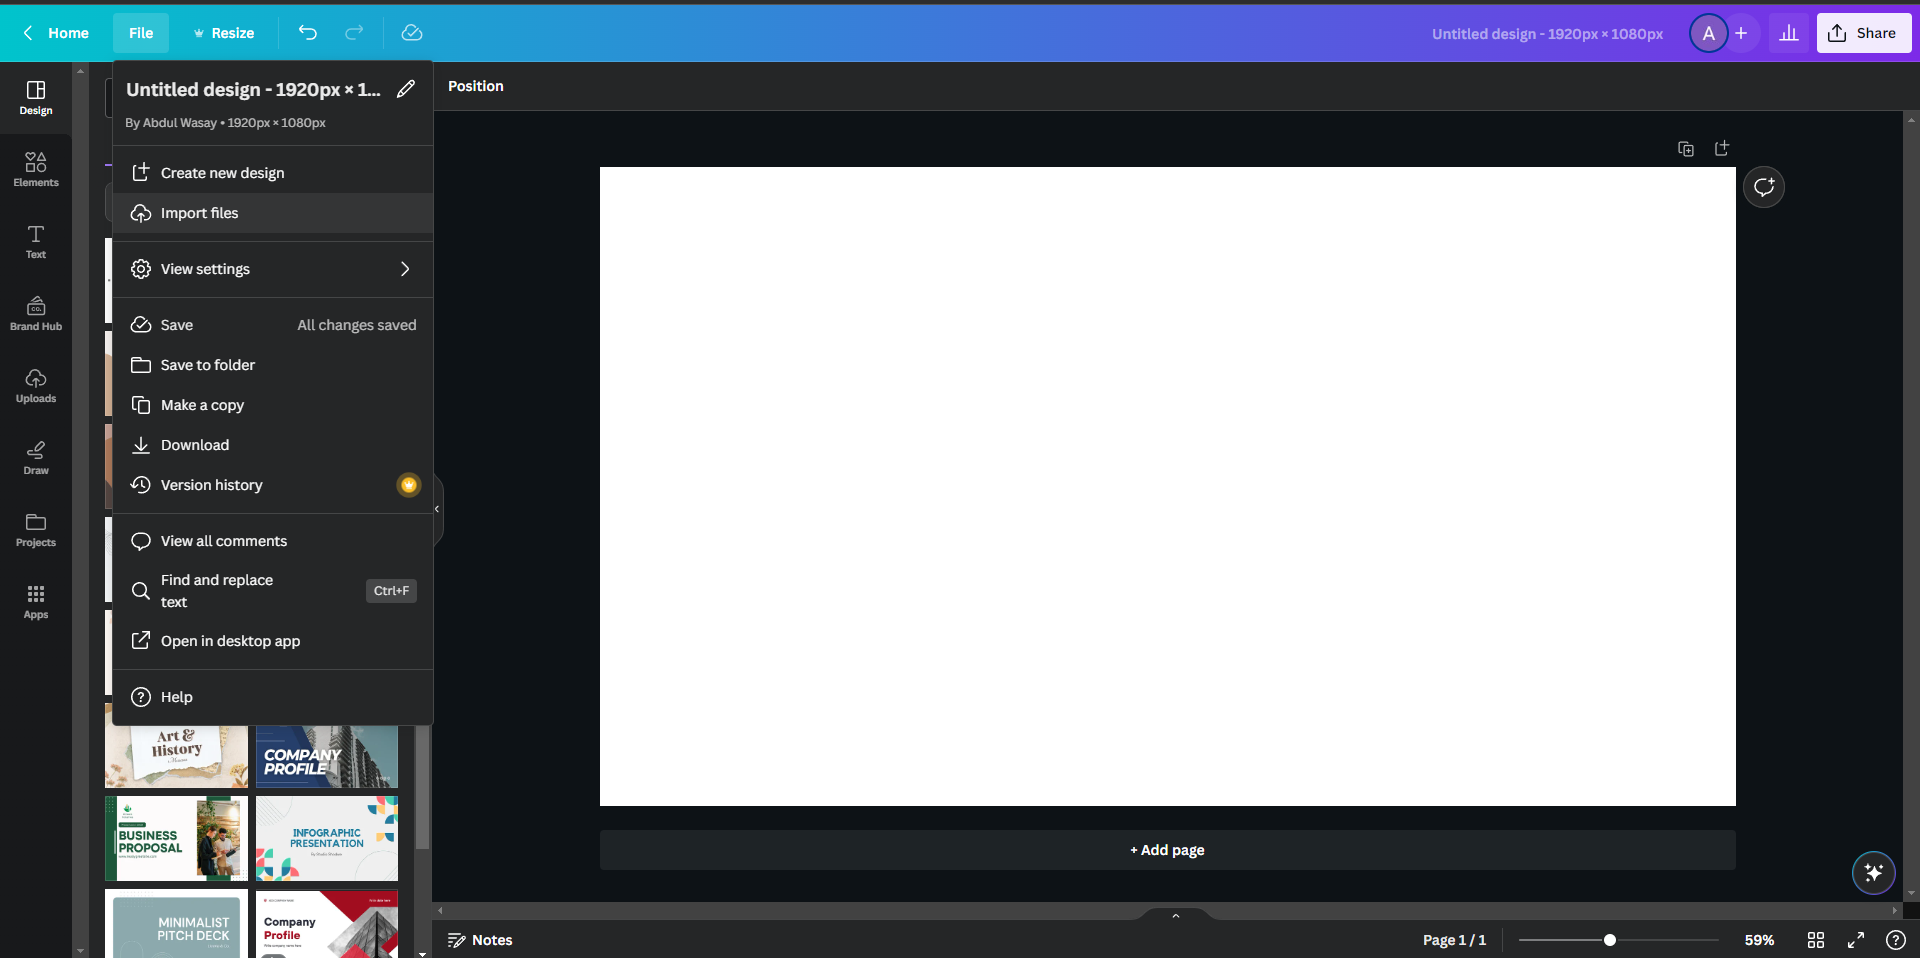
Importing File In Canva - Once your image is imported, click on the “Animate” button in the top menu.
Click on the “Animate” button to open a new section on the left side of your screen. Here, you’ll find a variety of animations. Select one of these to animate your image instantly. You can modify the animation’s intensity using the “Intensity” bar and some animations will allow you to configure speeds as well. However, remember that this requires a premium Canva account.
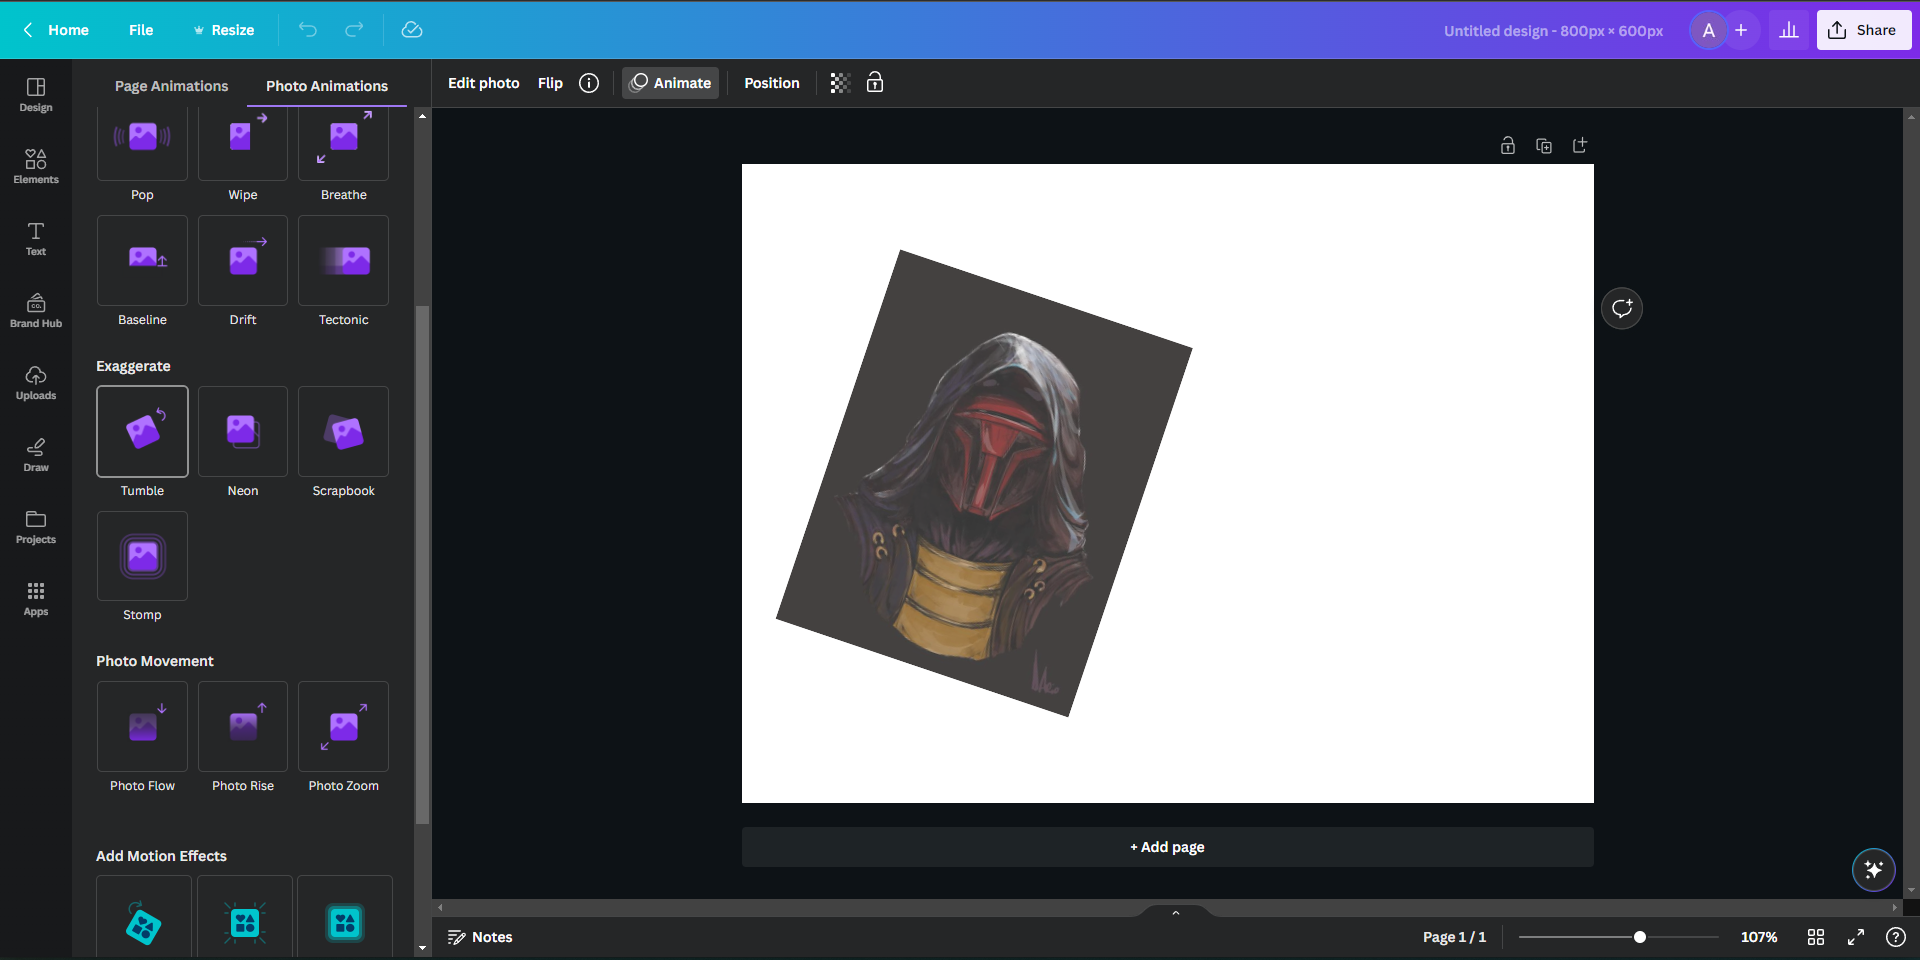
Animating An Image In Canva - When you’re satisfied with your animated photo, you can easily export it by clicking the “Share” button in the top right corner.
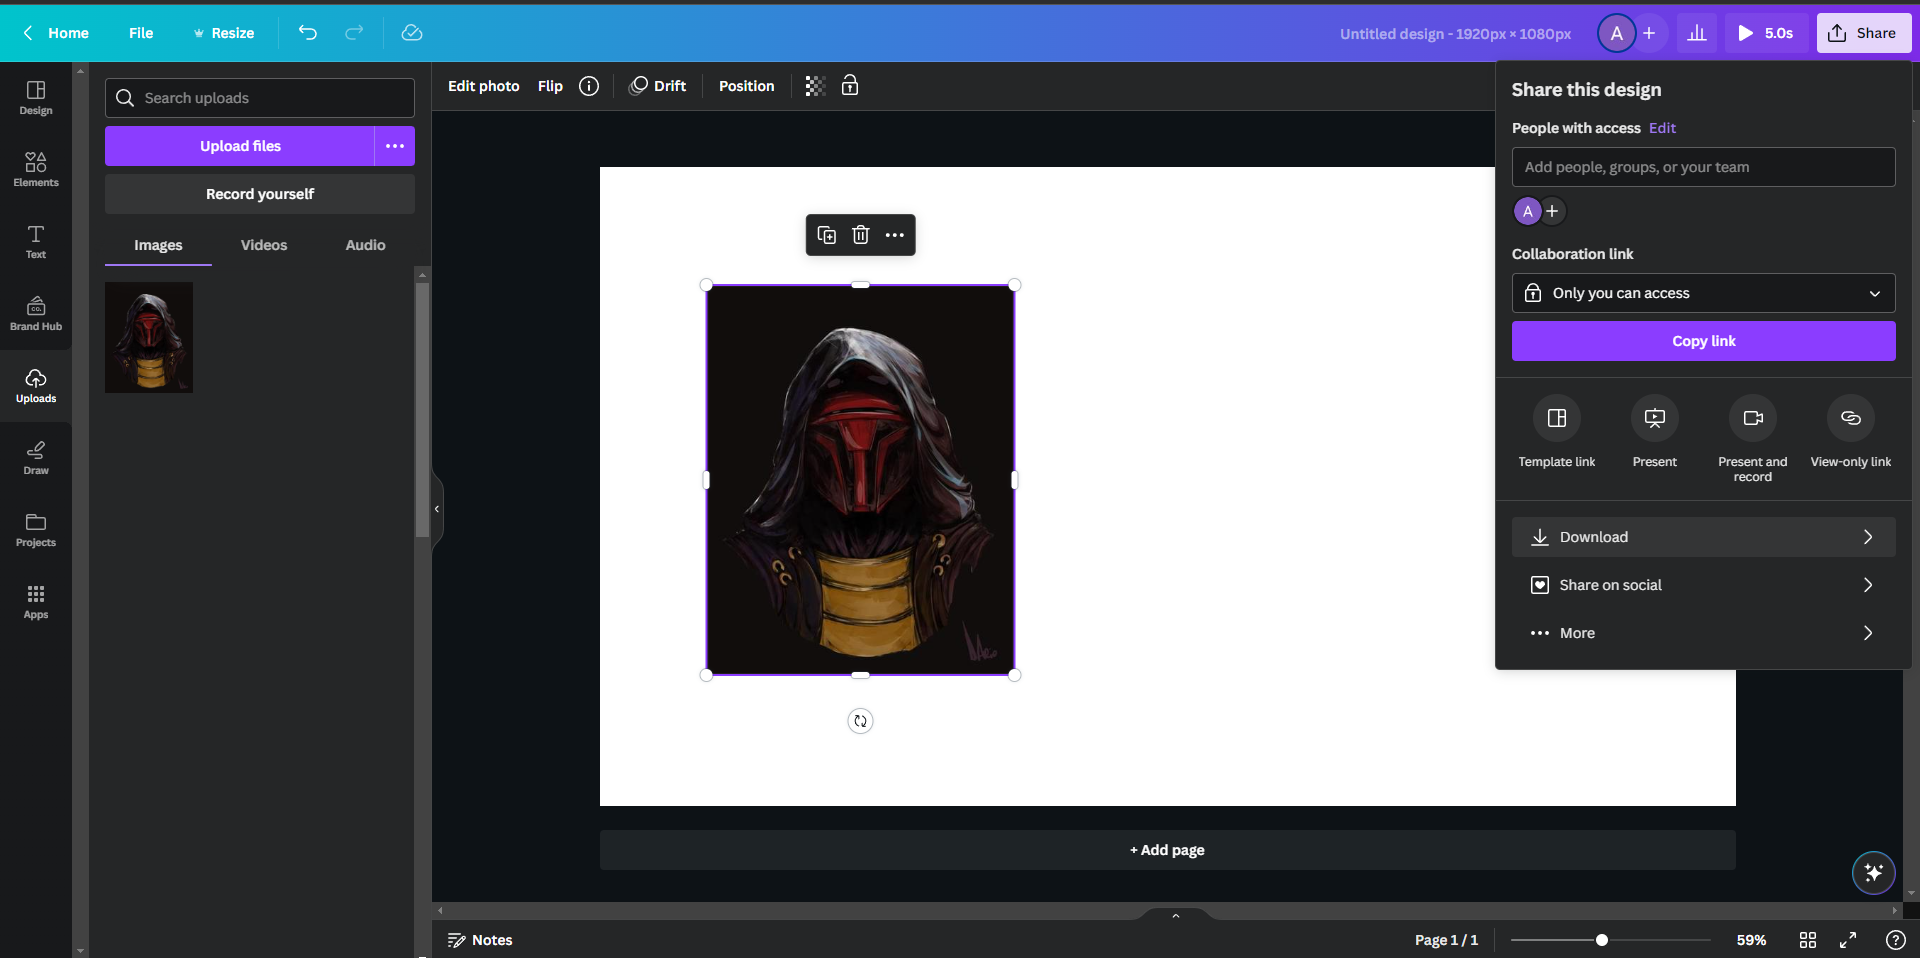
Exporting An Image In Canva - Upon clicking “Share,” you can select the format and resolution for your animated image export.

Selecting The Export Format In Canva
And there you have it – a simple, step-by-step guide to effortlessly animate and export an image using Canva.
Animate a picture using PicsArt
PicsArt is yet another great platform to animate your photos, even allowing the integration of AI aspects to help enhance and increase the resolution of your images so that they can stand out. This guide, however, will focus solely on animating a picture.
- Begin by heading over to PicsArt.com/create. The layout of PicsArt is quite similar to Canva.
- You can start a “New Project” or select a pre-made project from their template library, like “Instagram Story.”
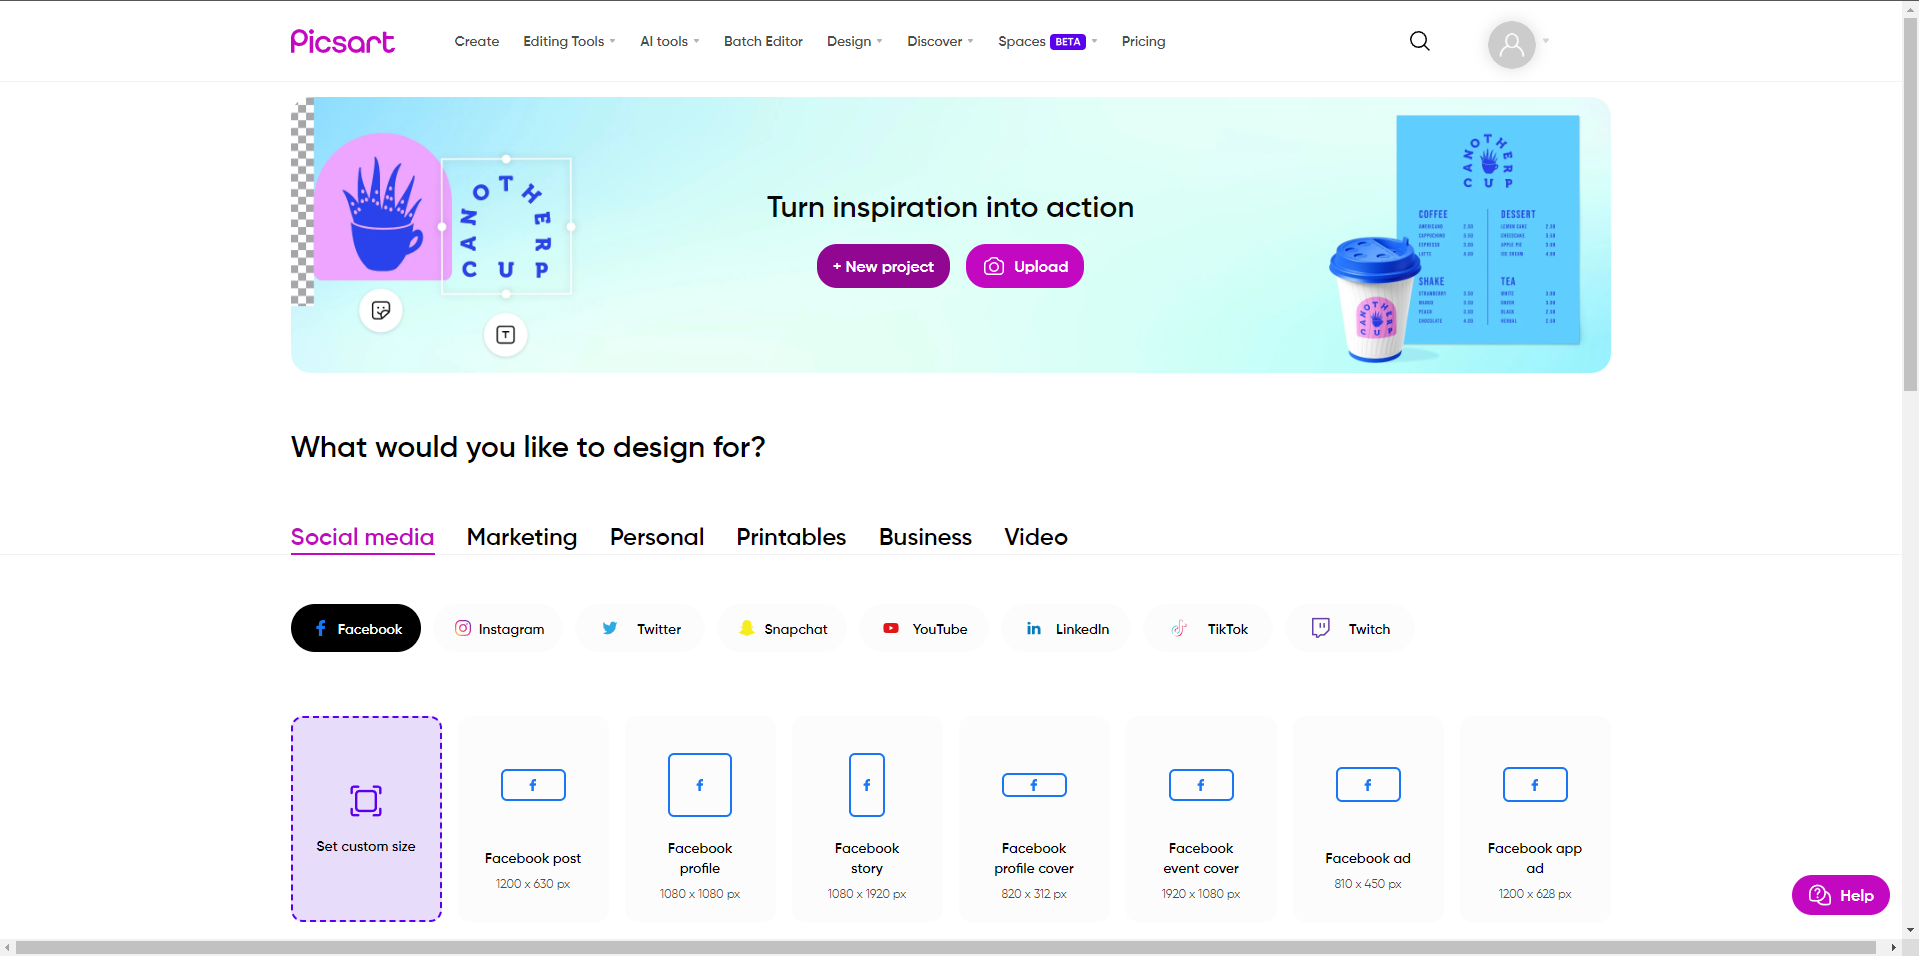
Creating A New Project In PicsArt - Once you’ve initiated a new project, you need to import your photo. To do this, click on “Uploads” in the left-hand menu, then press the purple “Upload” button located at the bottom.
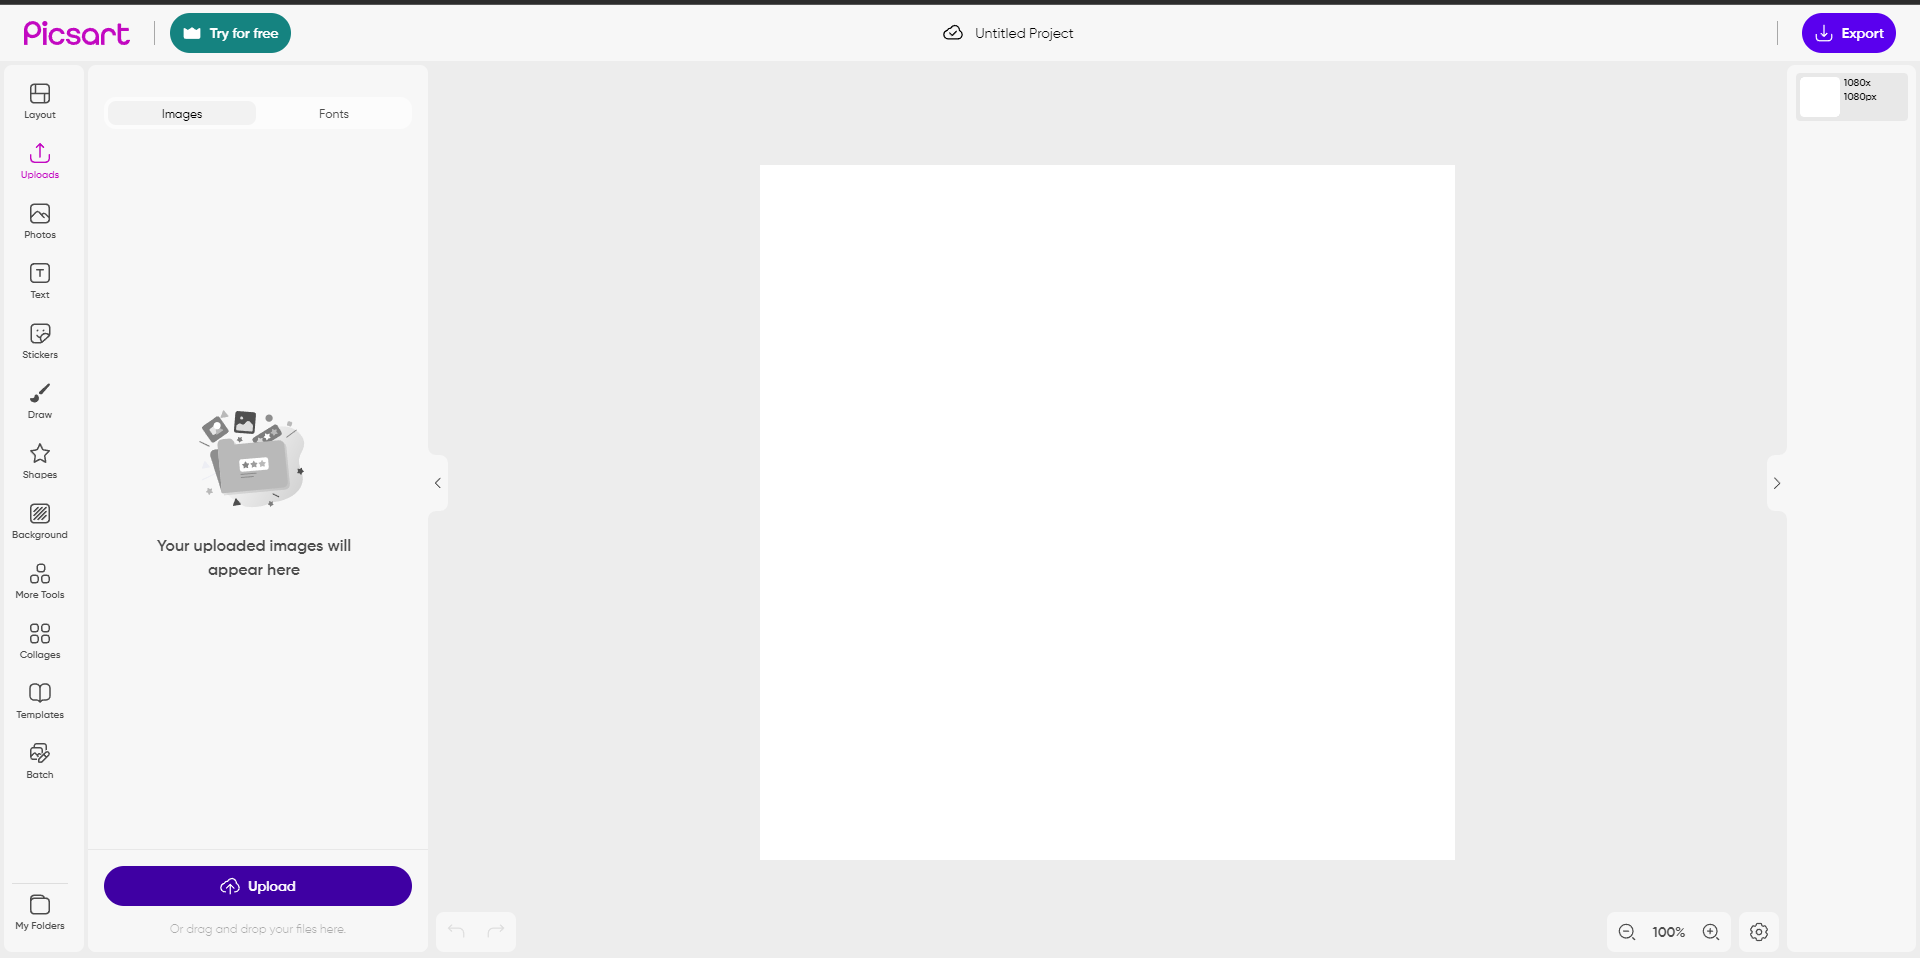
Uploading A Picture In PicsArt - After uploading your photo, click on the “Animation” button in the top menu. This action will open a new menu on the left side of the screen, where you can choose the type of animation you want for your image.
- Once you’ve settled on an animation style, click on the animation, after which PicsArt will automatically apply the animation to your image.
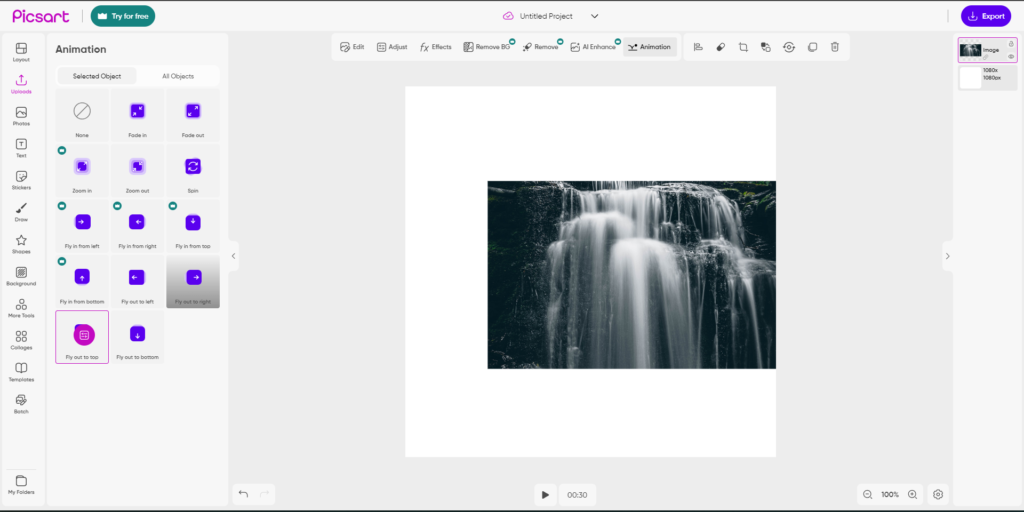
Animating A Picture In PicsArt - After animating, click “Export” in the top right corner to save your animated image. This option also lets you select the format and resolution for your exported image.
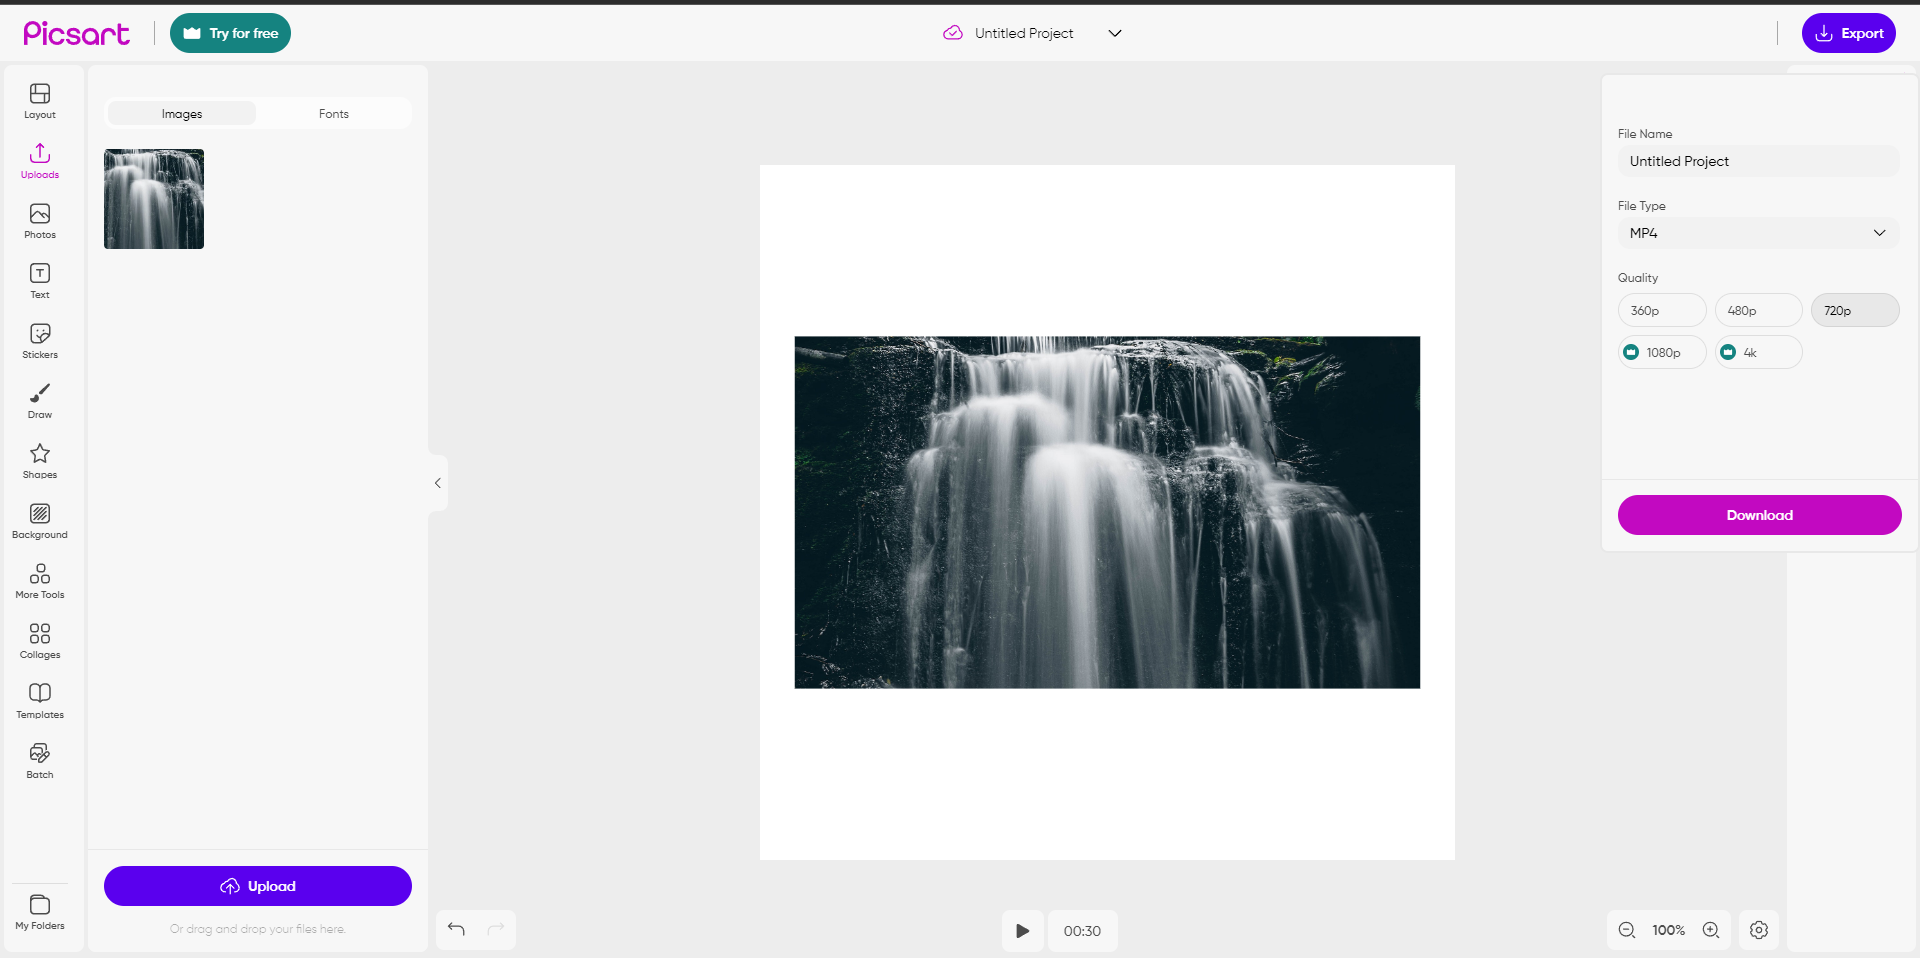
Exporting Your Animated Picture In PicsArt
And there you have it, your image is now animated using PicsArt!
Animate a picture using Photoshop
Adobe Photoshop stands unrivaled as the most detailed software for altering images. Thus, we can easily animate photos due to its vast array of versatile functions and tools. Here is an easy step-by-step guide to animating your pictures:
- Begin by uploading your preferred images to Adobe Photoshop.
- Highlight the image you want to work on by pressing “Q.”
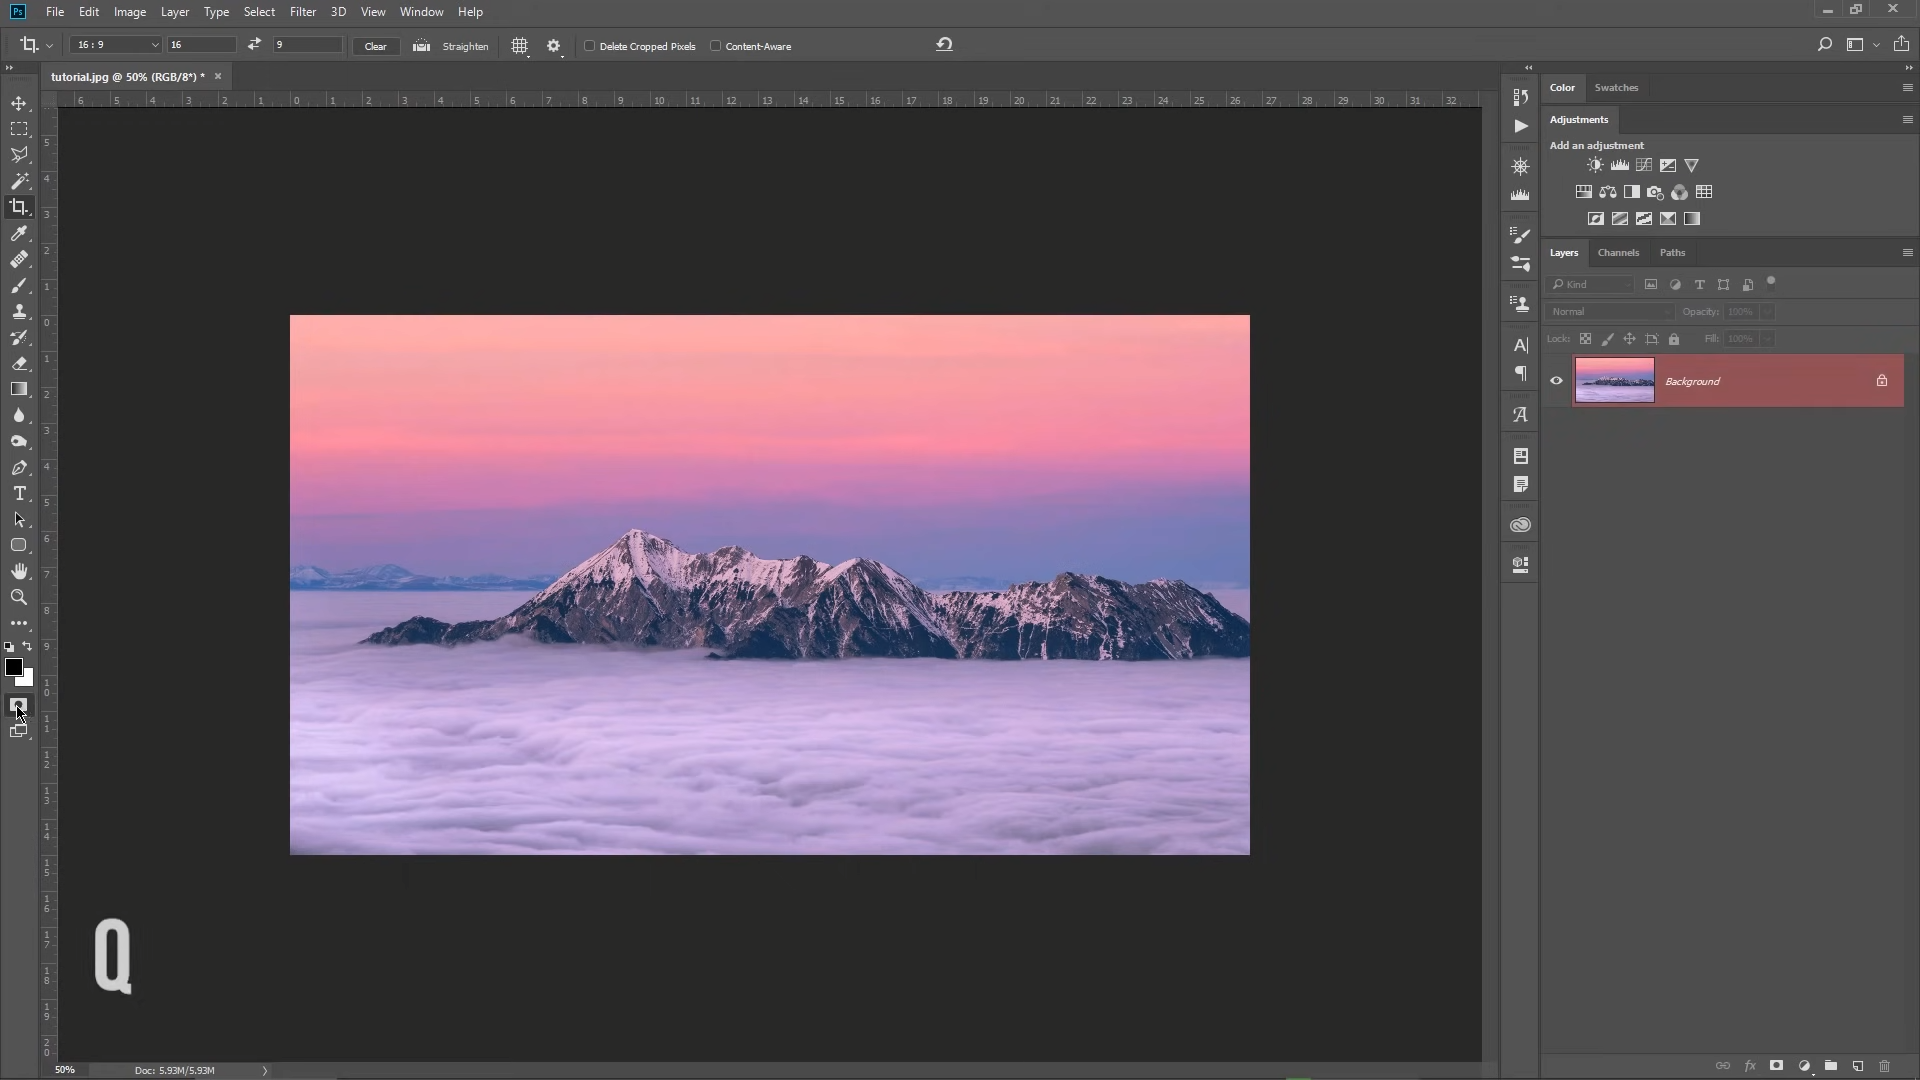
Selecting The Image In Photoshop - To start customizing, select the brush tool by pressing “B.” This tool lets you mark the sections of your image you wish to animate.
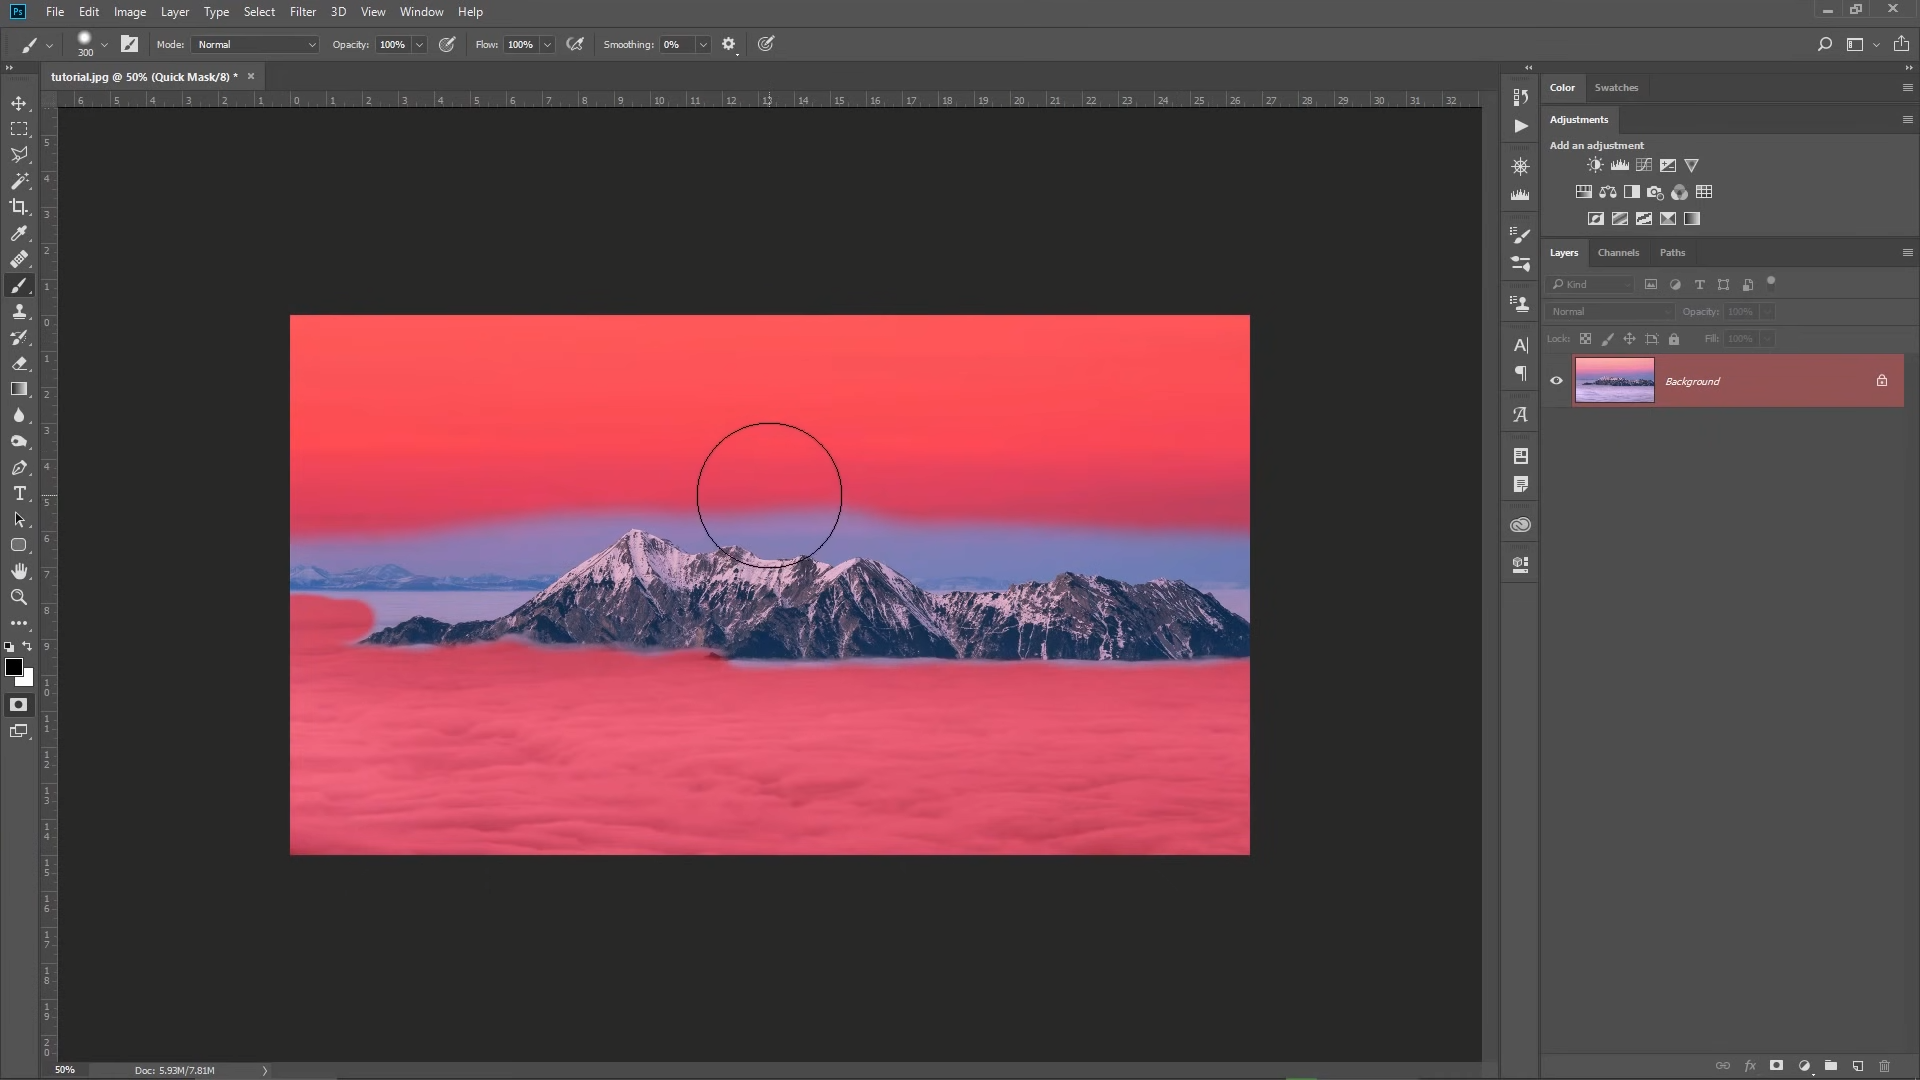
Marking The Sections Of Your Image - After completing your brushwork, press “CTRL + SHIFT + I” to invert the selection. This step is crucial and without it, the untouched parts of the image would become animated instead.
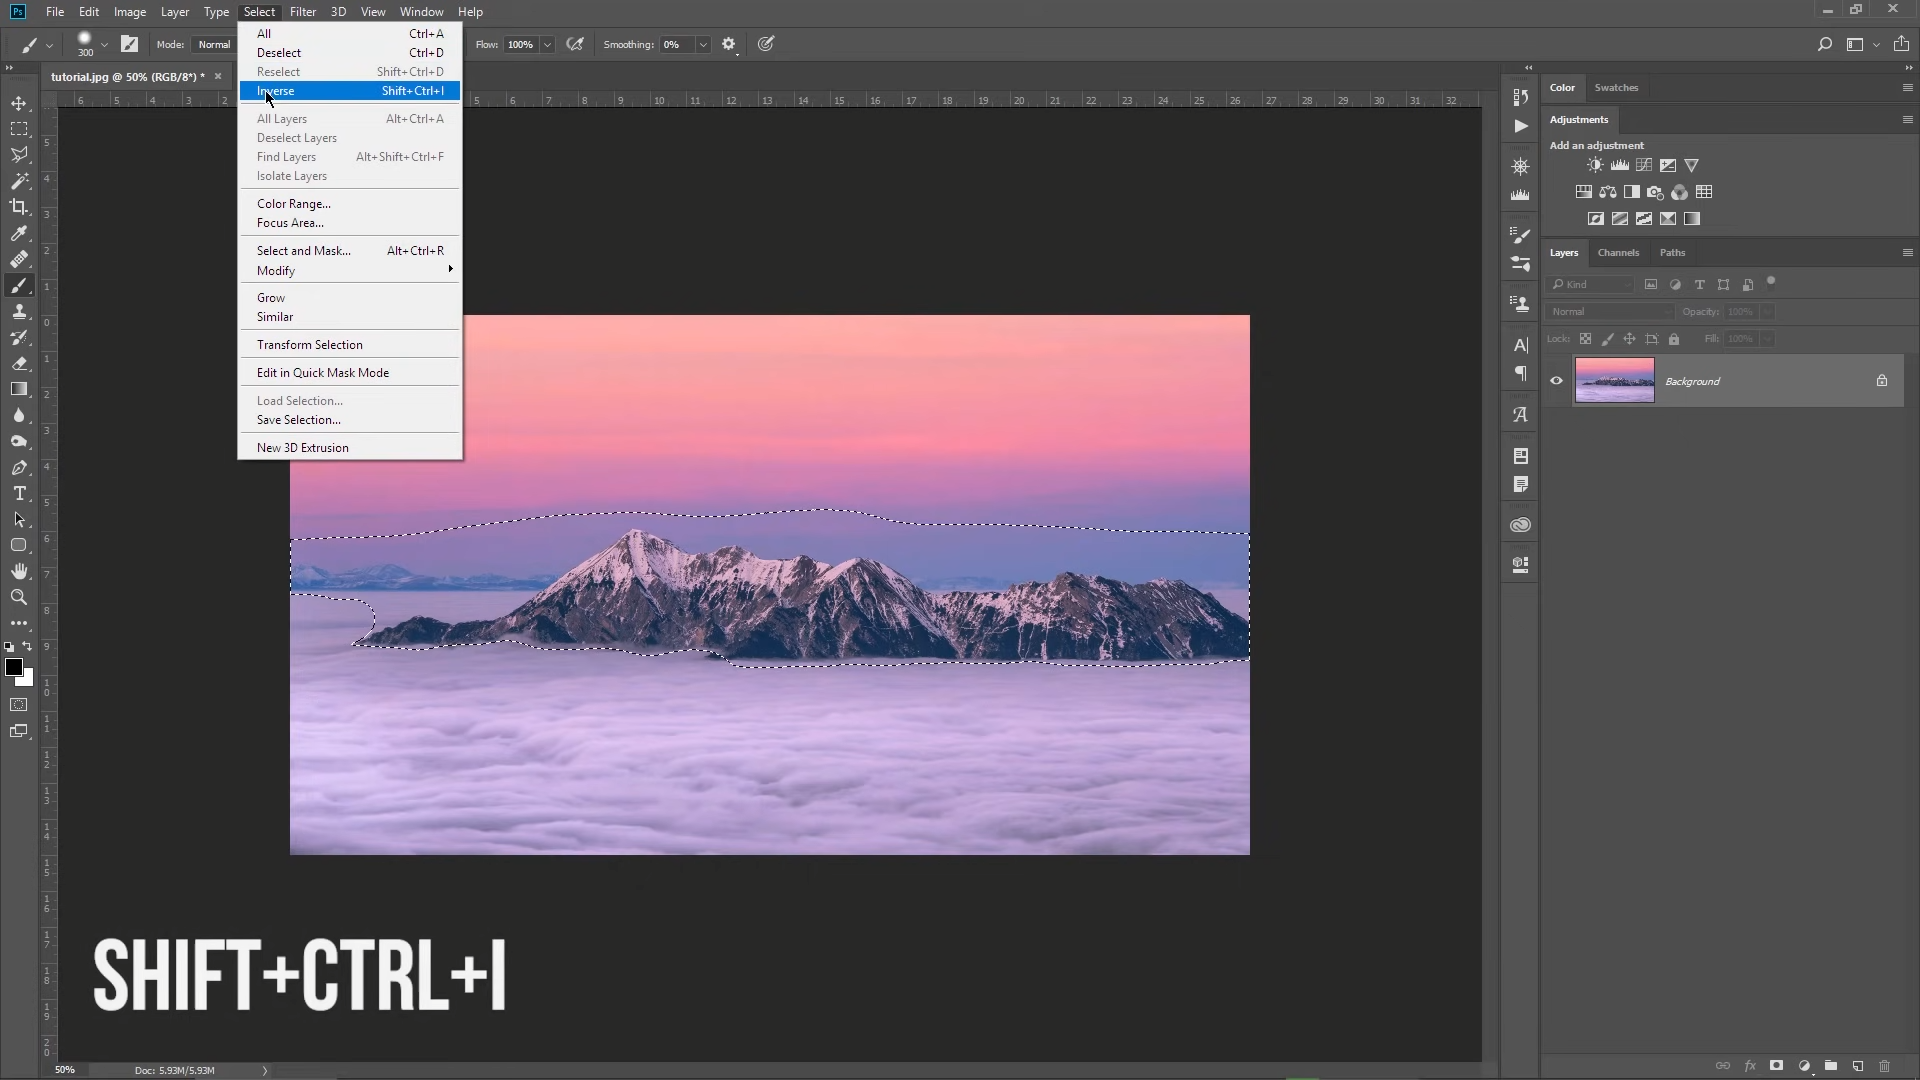
Inversing The Selection - After the selected portion of the photo has been inversed, press “CTRL + J.” This shortcut will cut out the section you wish to animate. Conveniently, Photoshop will automatically create a new layer for this part.
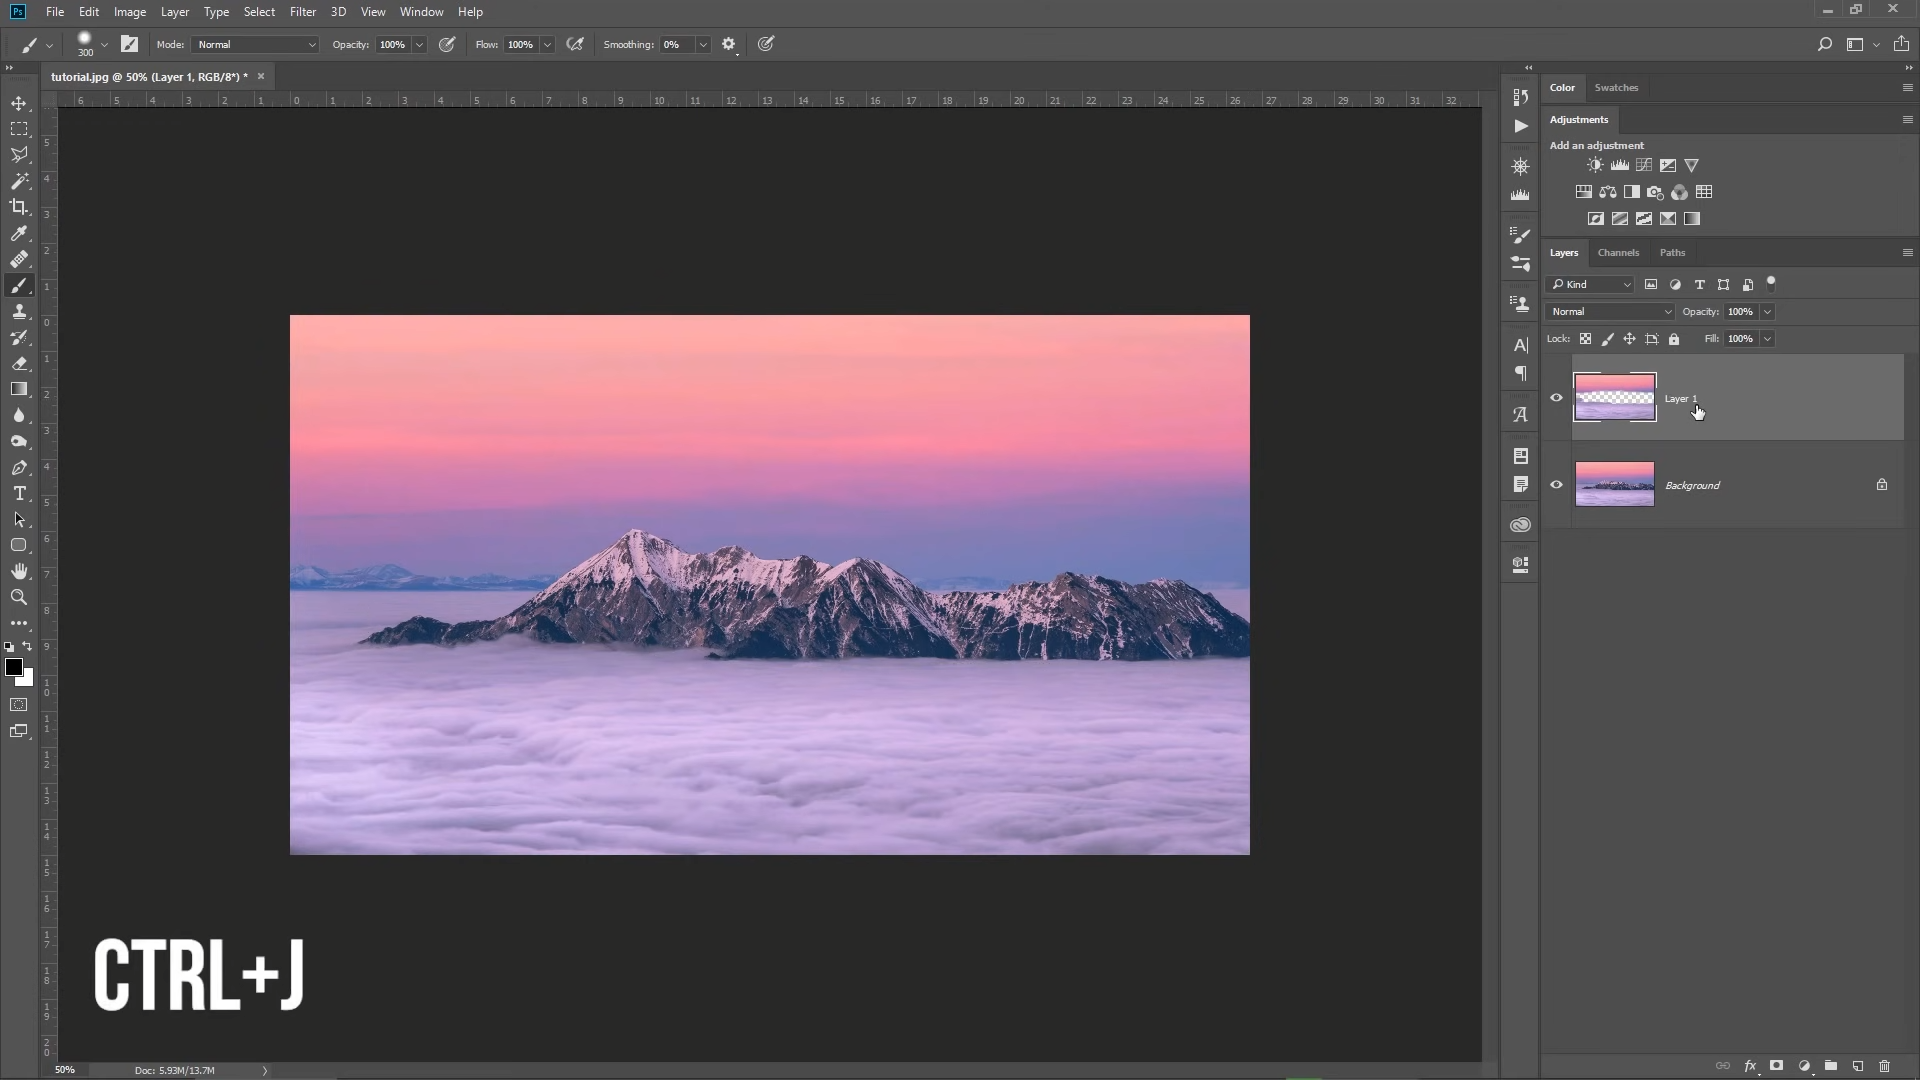
Making A New Layer - With the new layer selected, navigate to the “Window” section on the top bar and open the “Timeline” window.
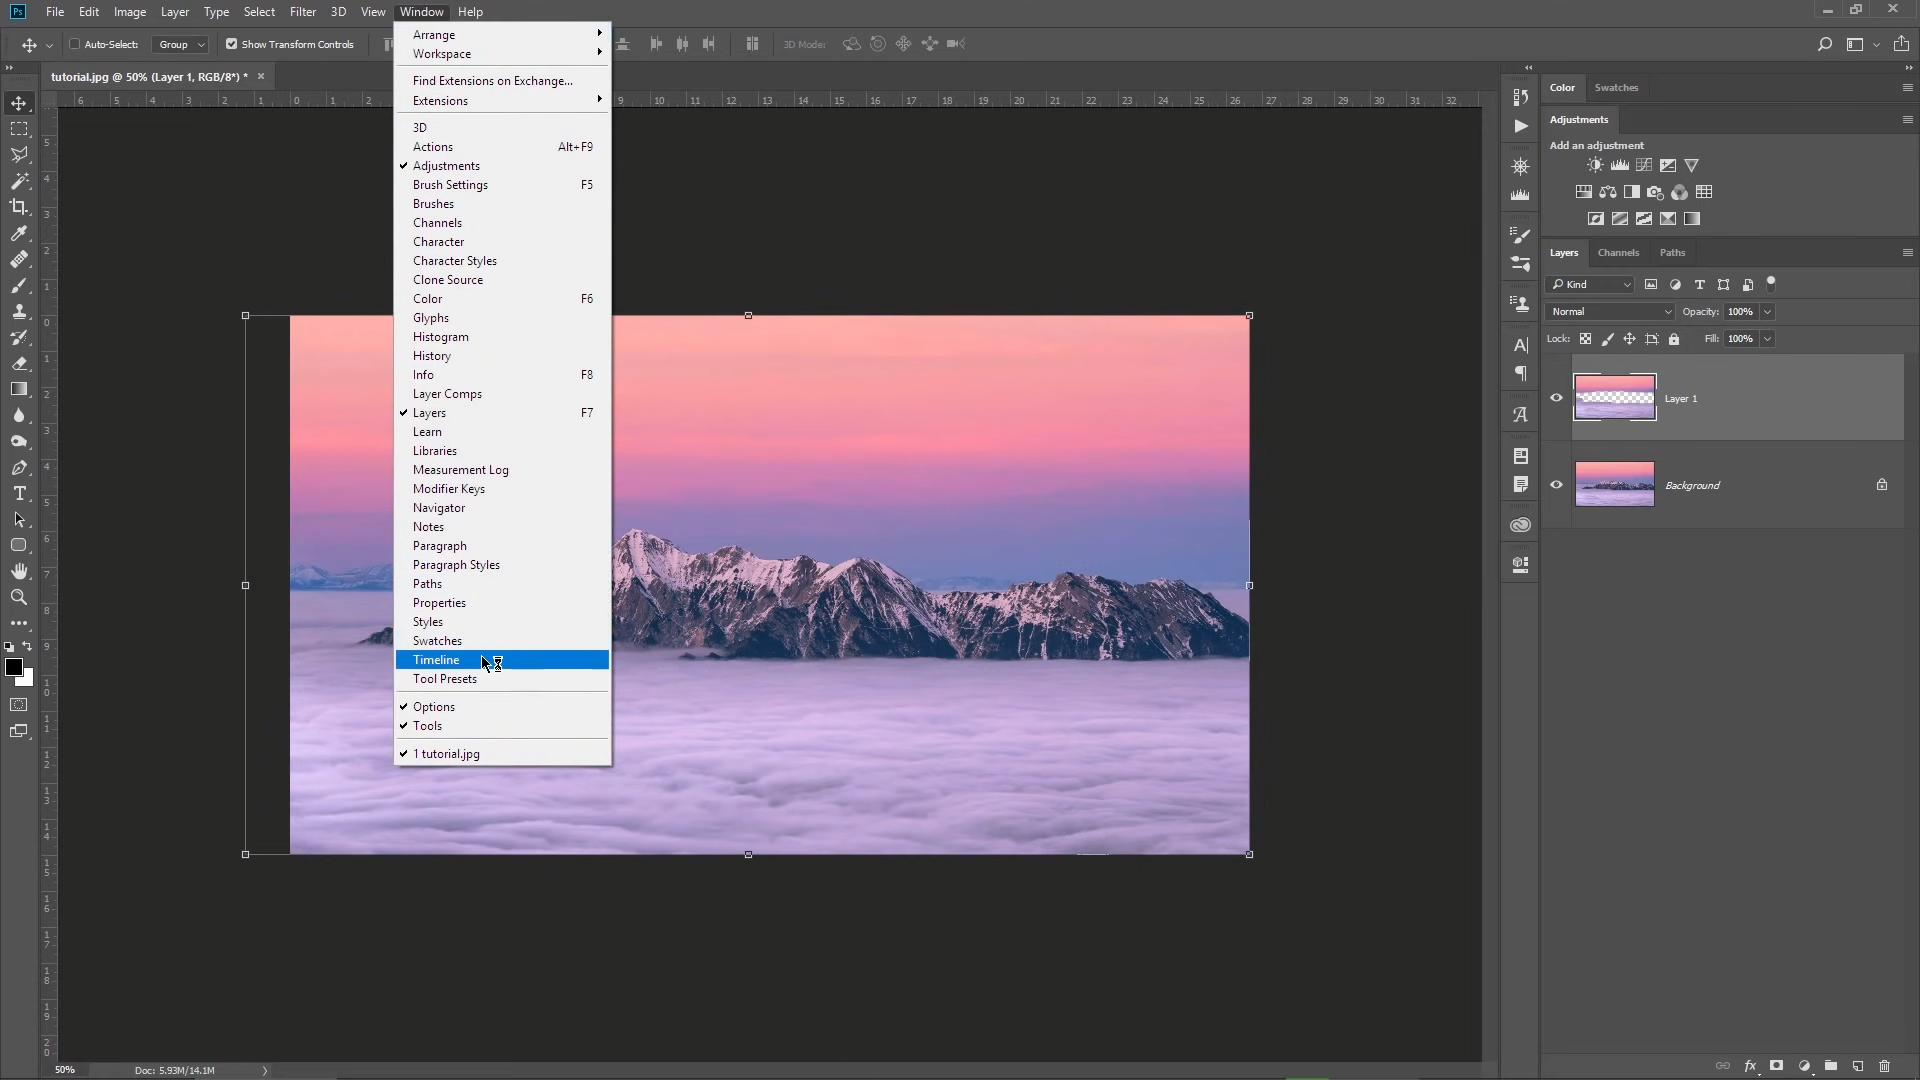
Opening The Timeline Window - Click on “Create Video Timeline” in this window for animating photos, or “Create Frame Animation” for making GIFs. The option should be visible in the bottom-center of the screen.
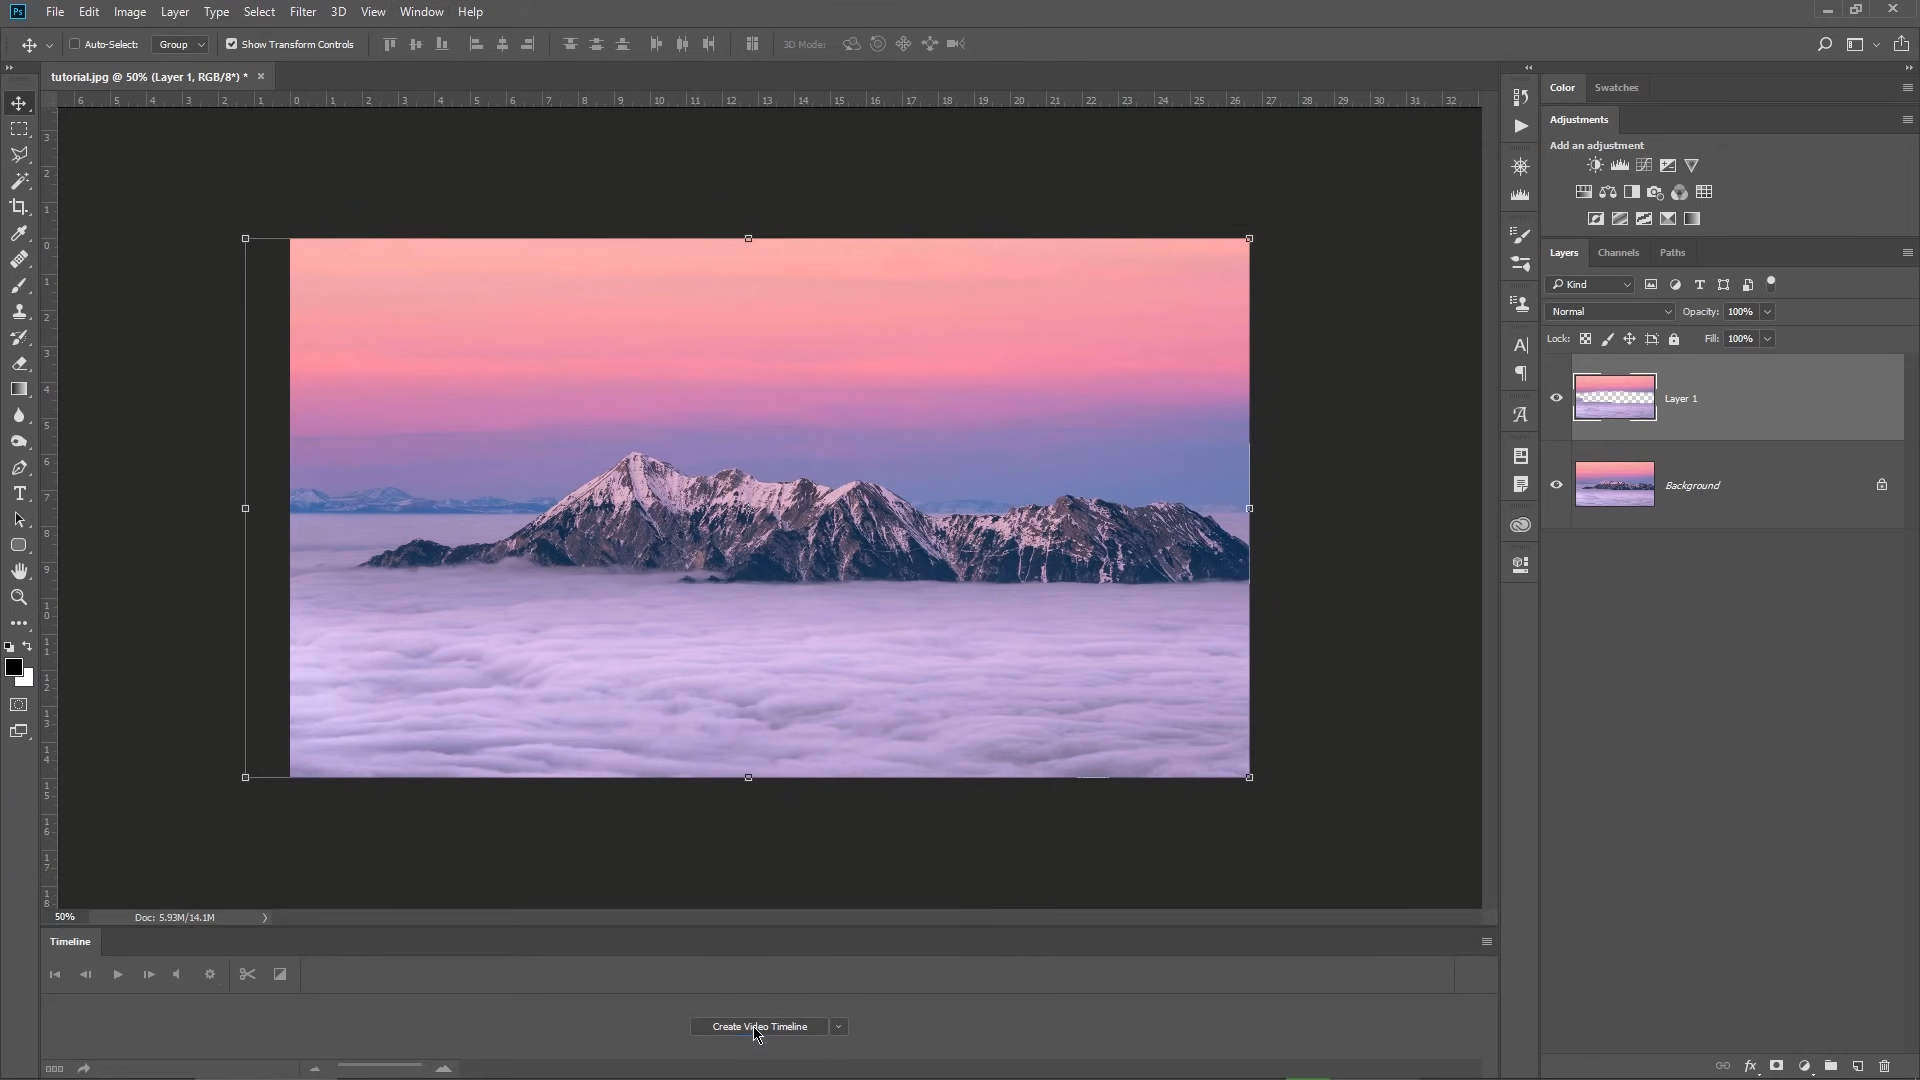
Creating Video Timeline - Next, adjust the new timeline bar to determine the length of your animation.
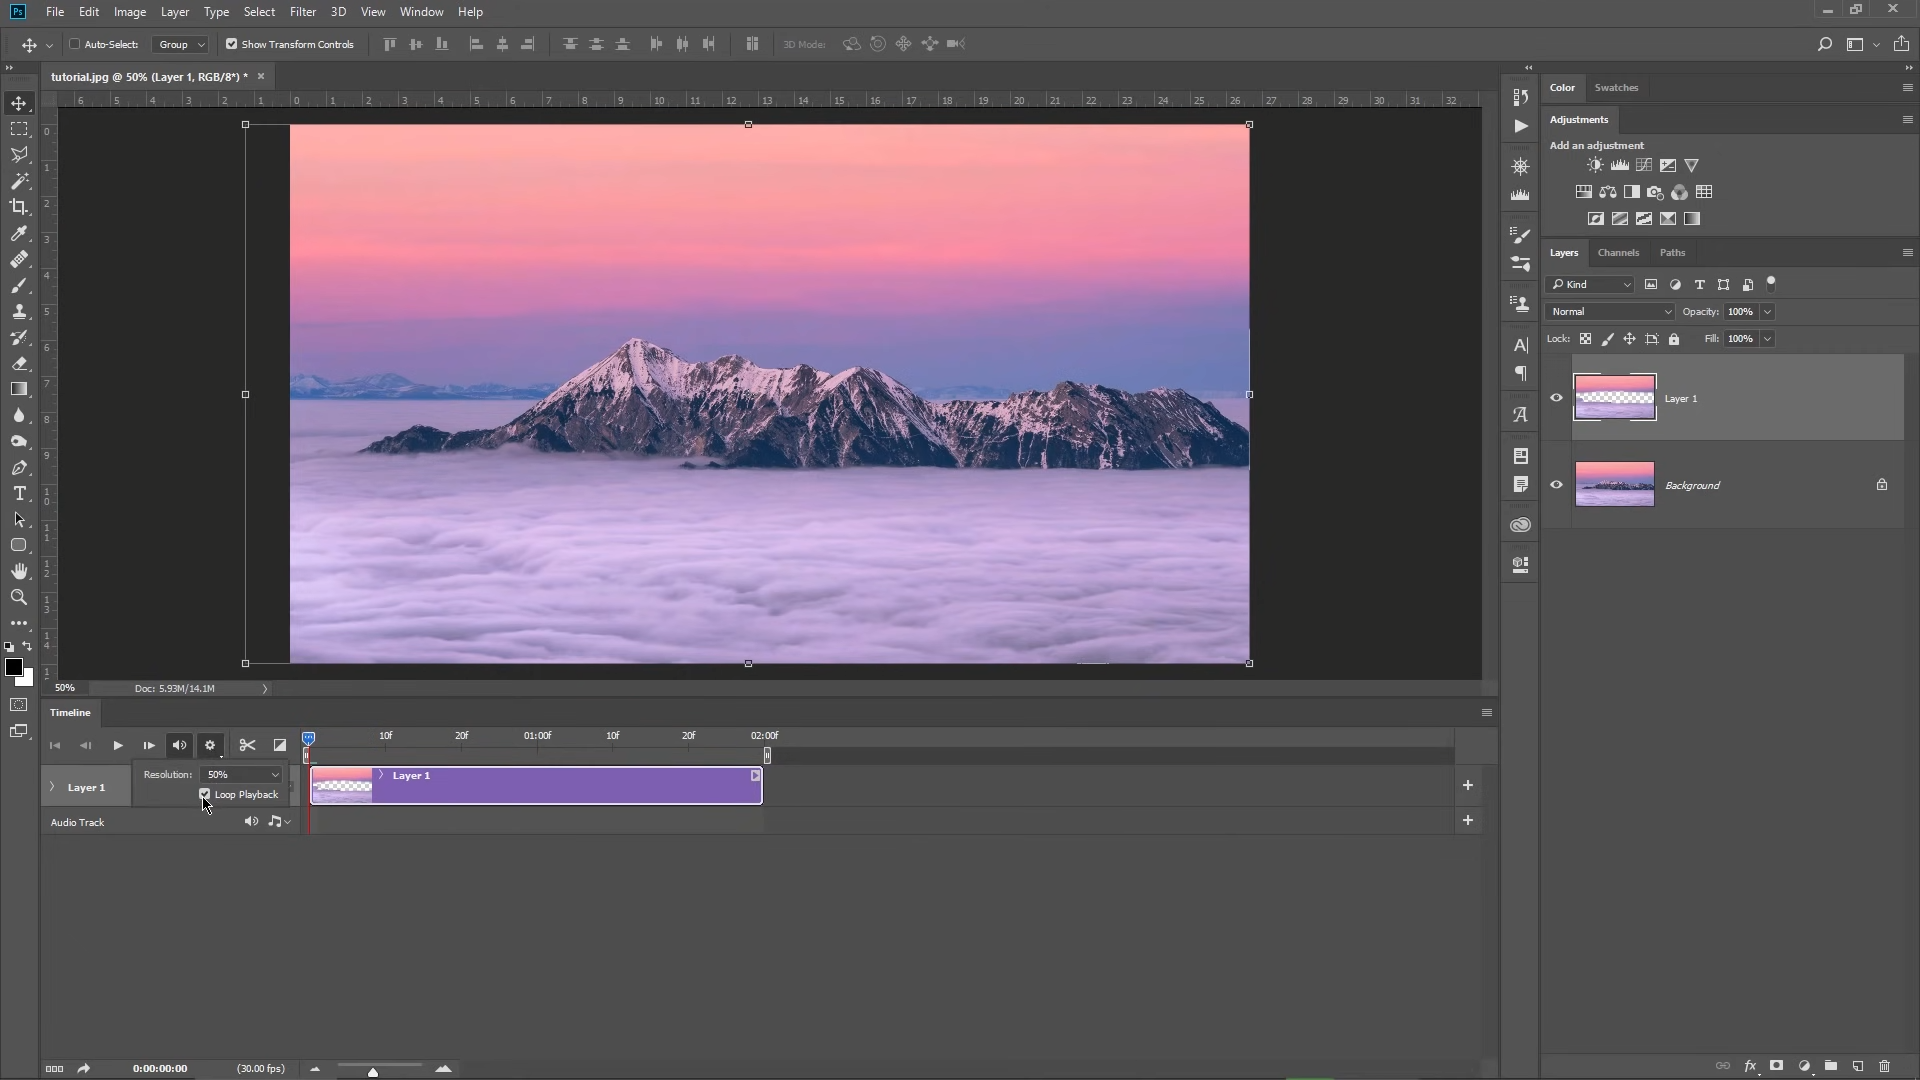
Determining The Length Of Video - Now, it’s time to animate your image. Move the layer of the cut photo in the direction you wish to animate, such as to the left.
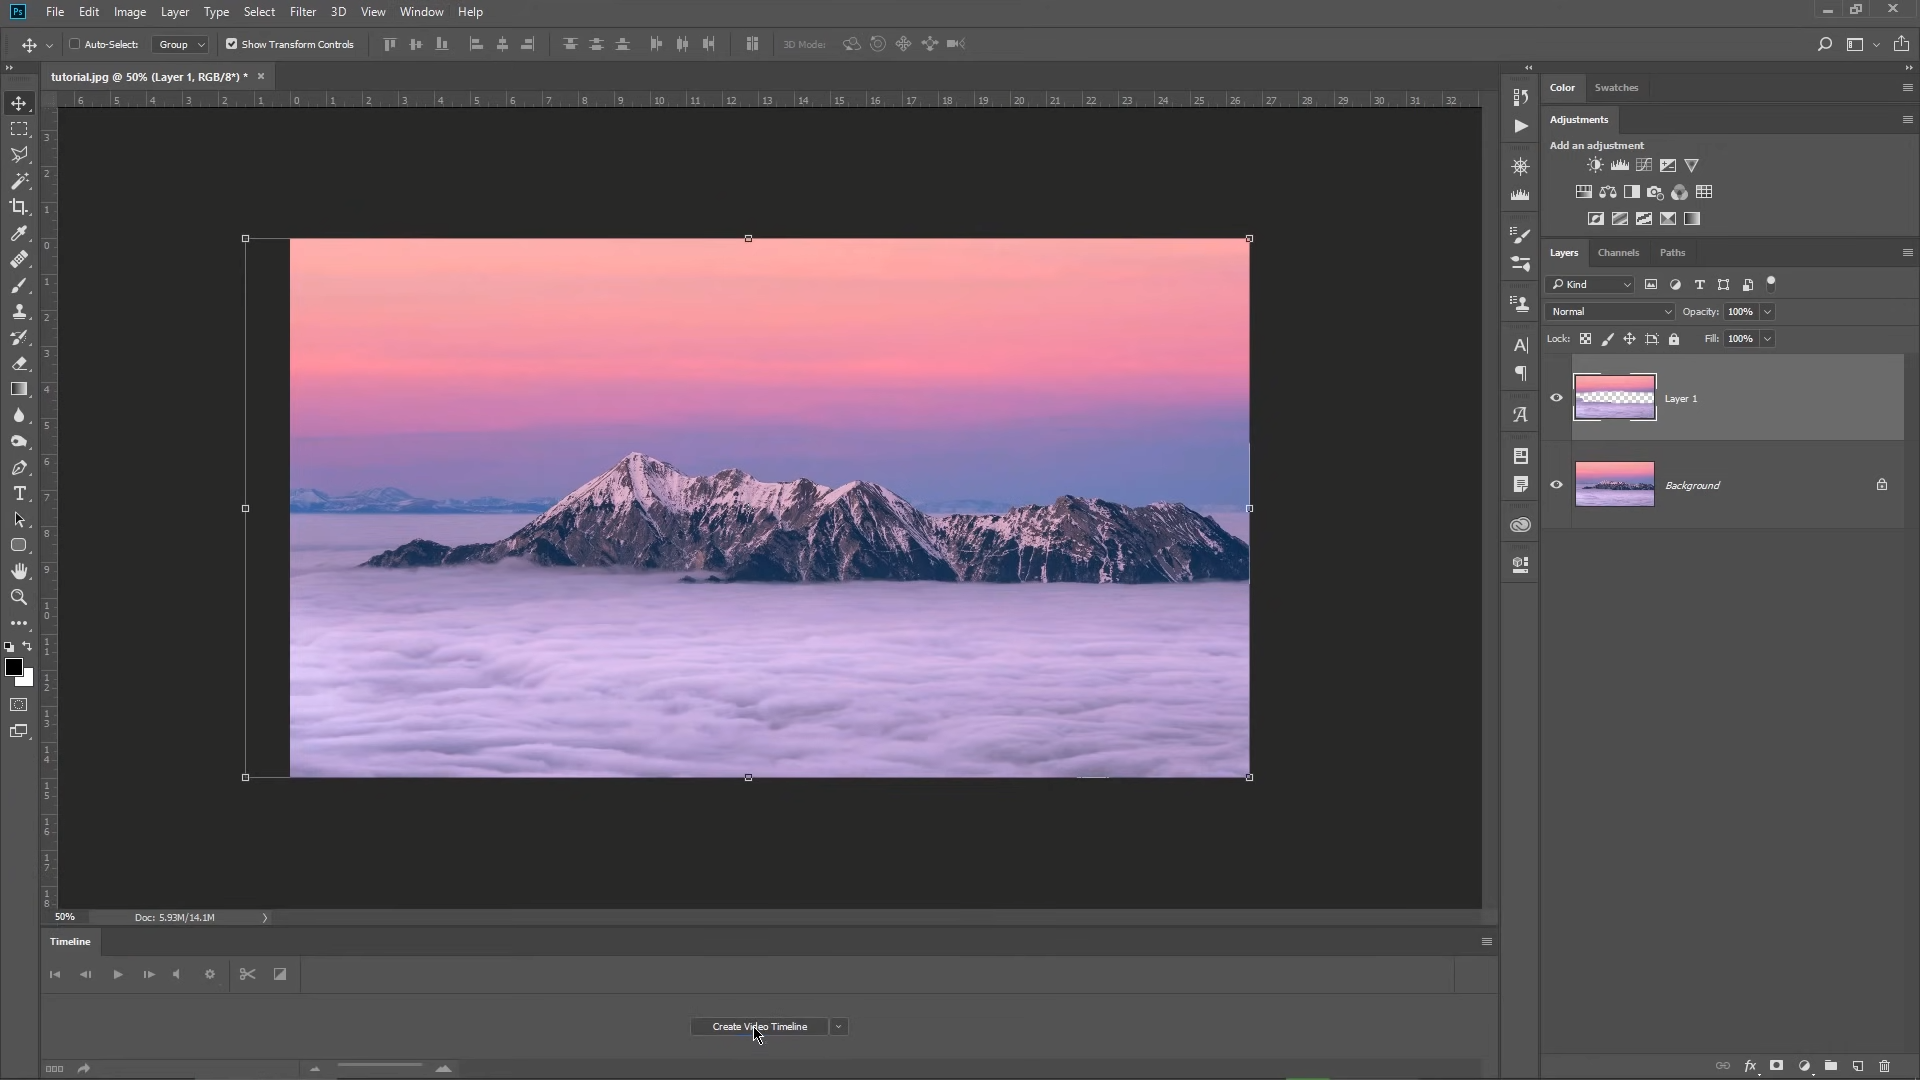
Creating The Animation By Moving The Picture - Once you’ve moved your image, navigate to the timeline bar and select the “Position Keyframe.” This keyframe will serve as the starting position for your animation.

Placing The Starting Keyframe - After setting the starting position and creating a keyframe, move your image back to its original position. Slide the timeline bar to the end of the animation, then create a new keyframe by clicking the clock button once more. This final keyframe marks the endpoint of your animation.
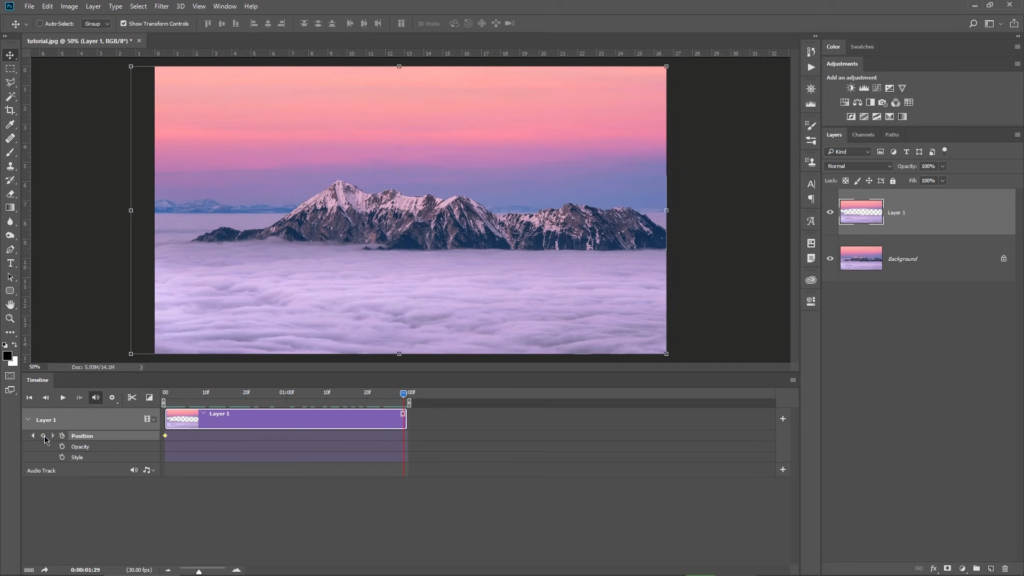
Placing The End Keyframe - Finally, hit “Play” to watch your animation come to life.
- To export your animated image, you need to click on “File,” then select “Export,” and finally, choose “Export As.” Select a file location and name and press Enter.
Congratulations! You now possess the skills to animate any image to your heart’s desire.
All images sourced from Cristi Kerekes.
Conclusion
After exploring these three great options that can animate your photo, you can choose and use the ones that look appealing. Canva and PicsArt are roughly the same in terms of animation styles. However, Photoshop can get advanced for some users, but you can design your own animations. So use the software or website you think will work best for you.
Animate a Picture - FAQs
You can not create any sort of custom animations in either Canva or PicsArt. You are bound to use their premade animations.
Yes, you can definitely create custom animations in Photoshop because the software has a versatile set of tools available for you to use, which allow you to create any animation that you want.
Yes, Canva and PicsArt require a premium subscription in order to use some of their advanced animation presets, such as fade-in and fade-out.
Yes, you can use all three options we’ve listed above to create GIFs. All you have to do is change the format while exporting the image.
 Reviewed by

